
1. Introduction

OpenThread is an open-source implementation of the Thread® networking protocol, which is a robust and secure wireless mesh networking protocol designed for the Internet of Things (IoT) devices. OpenThread was developed by Google's Nest team and is freely available to the developer community as an open-source project.
The Thread Specification establishes a reliable, secure, and energy-efficient wireless communication protocol for resource-constrained devices commonly found in smart homes and commercial buildings. OpenThread includes the full network layer scope within Thread, such as IPv6, 6LoWPAN, IEEE 802.15.4 with MAC security, mesh link establishment, and mesh routing.
Telink has integrated the OpenThread implementation into Zephyr RTOS, enabling seamless compatibility with Telink hardware. The source code for this integration is readily accessible on GitHub, and it is also provided as a software development kit (SDK).
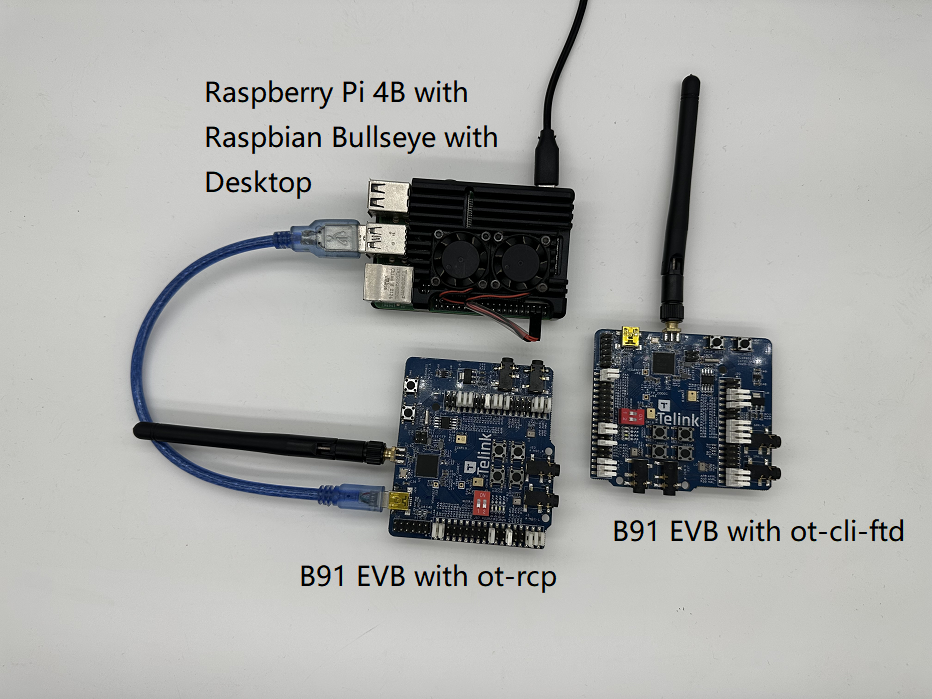
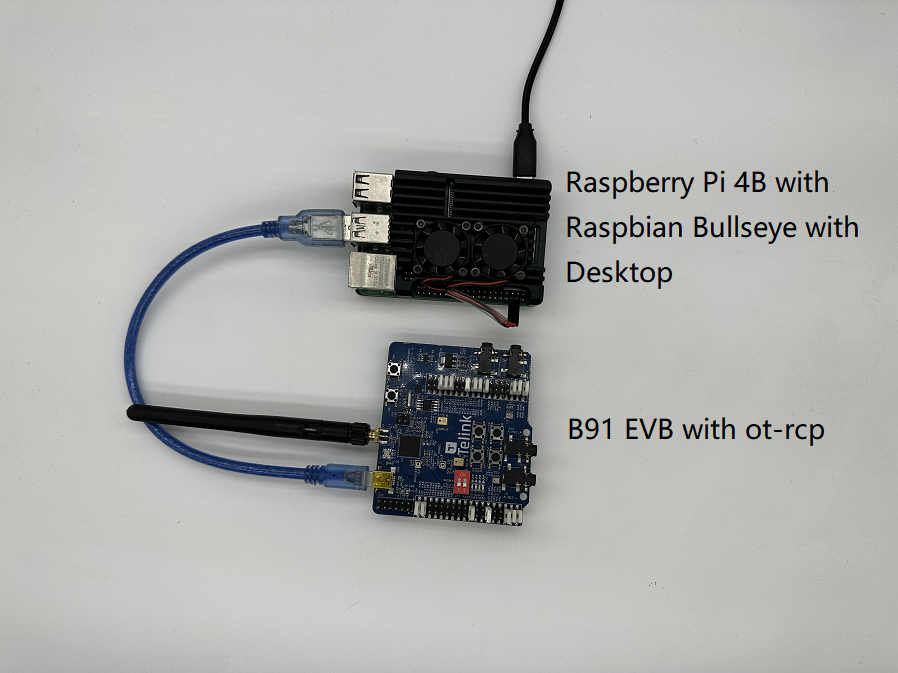
In this codelab, you will program OpenThread on actual hardware, create and manage a Thread network, and exchange messages between nodes. The image below depicts the hardware setup, featuring an OT Border Router (OTBR) and one Thread device in the codelab.
What you'll learn
- To set up OpenThread implementation using the Telink Zephyr development environment.
- To build the OpenThread CLI samples (
ot-cli-ftdandot-rcp) and flash them onto Telink B91 Development Boards. - To set up an OpenThread Border Router (OTBR) using Docker on a Raspberry Pi 3B+ or later.
- To create a Thread network on the OTBR.
- To add devices to the Thread network using out-of-band debugging.
- To validate the connectivity between nodes in the Thread network using CLI.
What you'll need
Hardware:
- Two B91 Development Boards.
- One Raspberry Pi 3B+ or greater with Raspbian OS Image.
- A Linux machine with at least two USB ports.
- An internet-connected switch (or Router) and several Ethernet cables.
Software:
- Telink Burning and Debugging Tool —— LinuxBDT.
- Serial port terminal tool, such as PuTTY.
- Other tools such as, Git and West.
2. Prerequisites
Thread Concepts and OpenThread CLI
It might be helpful to go through the OpenThread Simulation codelab to get familiar with fundamental Thread concepts and the OpenThread CLI before this codelab.
Linux Machine
The Linux machine (Ubuntu v20.04 LTS or later) acts as the build machine to set up the Telink Zephyr development environment and flash all Thread development boards. To accomplish these tasks, the Linux machine requires two available USB ports and internet connectivity.
Serial Port Connection and Terminals
You can directly plug the device into the USB port of the Linux machine. Additionally, you will need a serial port terminal tool to access the devices.
In this codelab, terminal tool PuTTY is used for controlling the FTD Joiner and Raspberry Pi. It offers an overview of its usage, but other terminal software can also be employed.
Telink B91 Development Kit
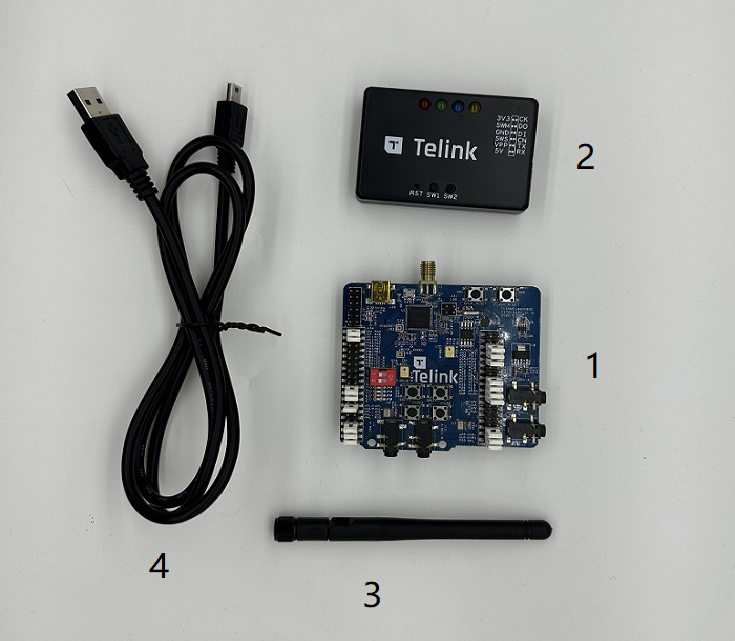
This codelab needs two sets of B91 Development Kits. The photo below displays the minimum required components in one set.
One of these kits will be used as RCP (Radio Co-Processor), while the other will function as FTD (Full Thread Device). If you are not yet in possession of the kit, you can acquire more details from the Telink official website. Some components to be used are as follows:
Index | Name |
1 | Telink B91 Development Board |
2 | Telink Burning Board |
3 | 2.4Ghz Antenna |
4 | USB Cable (USB A to mini USB) |
Raspberry Pi 3B+ or greater with Raspbian OS Image
In this codelab, a Raspberry Pi 3B+ or greater with Raspbian Bullseye Lite OS image or Raspbian Bullseye with Desktop is needed. It is connected to the internet via Ethernet and will be configured as the host for the OpenThread Border Router (OTBR).
Network Connection
An internet-connected switch (or router) and several Ethernet cables. They are used to connect the Raspberry Pi to the Linux machine, facilitating user configuration of the Raspberry Pi via the host.
LinuxBDT
Telink Burning and Debugging Tool (BDT), which applies to all Telink Chip series, allows you to erase and flash OpenThread firmware onto the Telink B91 Development Boards. Install the X86-based linux version linuxBDT on your Linux machine.
Others
- Git, for setting up Telink Zephyr Development Environment.
- West, for manage Zephyr project and build OpenThread binaries.
3. Set up Firmware
Set up Telink Zephyr Development Environment
On the Linux machine, open a CLI terminal and start by executing the following commands to ensure that your APT is up-to-date.
$ sudo apt update
$ sudo apt upgrade
Once that is done, proceed with the following steps.
- Install the dependencies.
$ wget https://apt.kitware.com/kitware-archive.sh
$ sudo bash kitware-archive.sh
$ sudo apt install --no-install-recommends git cmake ninja-build \
gperf ccache dfu-util device-tree-compiler python3-dev python3-pip \
python3-setuptools python3-tk python3-wheel xz-utils file make gcc \
gcc-multilib g++-multilib libsdl2-dev
$ cmake --version
$ python3 --version
$ dtc --version
- Install west.
$ pip3 install --user -U west
$ echo 'export PATH=~/.local/bin:"$PATH"' >> ~/.bashrc
$ source ~/.bashrc
~/.local/binis in your$PATHenvironment variable. - Get the Zephyr Project source code.
$ west init ~/zephyrproject
$ cd ~/zephyrproject
$ west update
$ west blobs fetch hal_telink
$ west zephyr-export
- Install additional Python dependencies for Zephyr.
$ pip3 install --user -r ~/zephyrproject/zephyr/scripts/requirements.txt
- Set up the Zephyr toolchain. Download the Zephyr toolchain (about 1~2 GB) to a local directory to allow you to flash most boards.
$ wget https://github.com/zephyrproject-rtos/sdk-ng/releases/download/v0.16.1/zephyr-sdk-0.16.1_linux-x86_64.tar.xz
$ wget -O - https://github.com/zephyrproject-rtos/sdk-ng/releases/download/v0.16.1/sha256.sum | shasum --check --ignore-missing
$HOME/zephyr-sdk[-x.y.z]
$HOME/.local/zephyr-sdk[-x.y.z]
$HOME/.local/opt/zephyr-sdk[-x.y.z]
$HOME/bin/zephyr-sdk[-x.y.z]
/opt/zephyr-sdk[-x.y.z]
/usr/zephyr-sdk[-x.y.z]
/usr/local/zephyr-sdk[-x.y.z]
$ tar xvf zephyr-sdk-0.16.1_linux-x86_64.tar.xz
$ cd zephyr-sdk-0.16.1
$ ./setup.sh -t riscv64-zephyr-elf -h -c
- Build the Hello World example. First, verify that the official Zephyr project configuration is correct using the Hello World example, then proceed with setting up your custom project.
$ cd ~/zephyrproject/zephyr
$ west build -p auto -b tlsr9518adk80d samples/hello_world
zephyr.binunder thebuild/zephyr directory. - Add the Zephyr environment script to
~/.bashrc. Execute the following commands.$ echo "source ~/zephyrproject/zephyr/zephyr-env.sh" >> ~/.bashrc $ source ~/.bashrc
- Add the Telink Zephyr remote repository. Download the Telink repo locally as a development branch and update it.
$ cd ~/zephyrproject/zephyr
$ git remote add telink-semi https://github.com/telink-semi/zephyr
$ git fetch telink develop
$ git checkout develop
$ west update
$ west blobs fetch hal_telink
For more information, you can refer to Zephyr Doc – Getting Started Guide.
Set up Telink LinuxBDT
Download the Telink LinuxBDT tool and extract it to a local directory on your Linux machine, such as home directory ~, enabling to flash firmware onto the B91 Development Board.
$ cd ~
$ wget http://wiki.telink-semi.cn/tools_and_sdk/Tools/BDT/LinuxBDT.tar.bz2
$ tar -vxf LinuxBDT.tar.bz2
Connect the Burning Board to the Linux machine via the USB interface, and then enter the following commands.
$ cd LinuxBDT
$ sudo ./bdt lsusb -v
Bus 002 Device 001: ID 1d6b:0003 xHCI Host Controller
Bus 001 Device 003: ID 0bda:565a Integrated_Webcam_HD
Bus 001 Device 023: ID 413c:301a Dell MS116 USB Optical Mouse
Bus 001 Device 037: ID 248a:826a Telink Web Debugger v3.6
Bus 001 Device 001: ID 1d6b:0002 xHCI Host Controller
If you see the message "Telink Web Debugger v3.6", it indicates that the BDT programmer has successfully connected to the Linux machine.
Firmware Compilation
This codelab will build two types of OpenThread firmware:
ot-cli-ftd,- and
ot-rcp.
The compilation methods are as follows:
- Radio Co-Processor(
ot-rcp)$ cd ~/zephyrproject $ rm -rf build_ot_coprocessor $ west build -b tlsr9518adk80d -d build_ot_coprocessor zephyr/samples/net/openthread/coprocessor -- -DDTC_OVERLAY_FILE="usb.overlay" -DOVERLAY_CONFIG=overlay-rcp-usb-telink.conf
- Full-Featured Thread Device with Interactive Command Line (
ot-cli-ftd)$ cd ~/zephyrproject $ rm -rf build_ot_cli_ftd $ west build -b tlsr9518adk80d -d build_ot_cli_ftd zephyr/samples/net/openthread/cli -- -DOVERLAY_CONFIG=overlay-telink-fixed-mac.conf -DCONFIG_OPENTHREAD_FTD=y
Firmware Flash
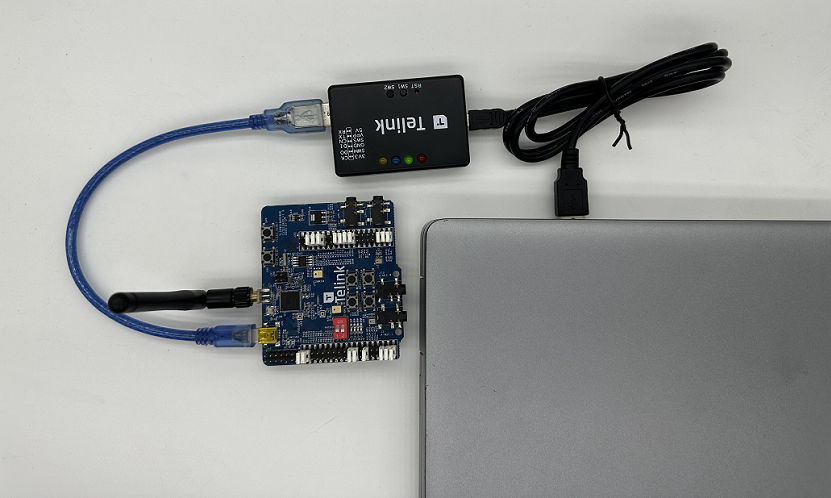
Connect a B91 Development Board to the Burning Board using a USB cable as illustrated in the figure below.
In the command line, execute the following commands to perform firmware burning (using the flashing of the ot-cli-ftd firmware as an example).
$ cd ~/zephyrproject/build_ot_cli_ftd/zephyr
$ cp zephyr.bin ~/LinuxBDT/bin/ot-cli-ftd.bin
$ cd ~/LinuxBDT
$ sudo ./bdt 9518 ac
 Activate OK!
$ sudo ./bdt 9518 wf 0 -i bin/ot-cli-ftd.bin
 EraseSectorsize...
 Total Time: 2181 ms
 Flash writing...
 [100%][-] [##################################################]
 File Download to Flash at address 0x000000: 491700 bytes
 Total Time: 30087 ms
The flash method for ot-rcp is basically the same as that for ot-cli-ftd. However, there are differences in the firmware paths and names.
After flashing, distinguish the two B91 Development Boards by marking them accordingly. Label the board flashed with ot-cli-ftd as "FTD Joiner" and the board flashed with ot-rcp as "RCP".
4. Configure a Serial Console for the FTD Joiner Device
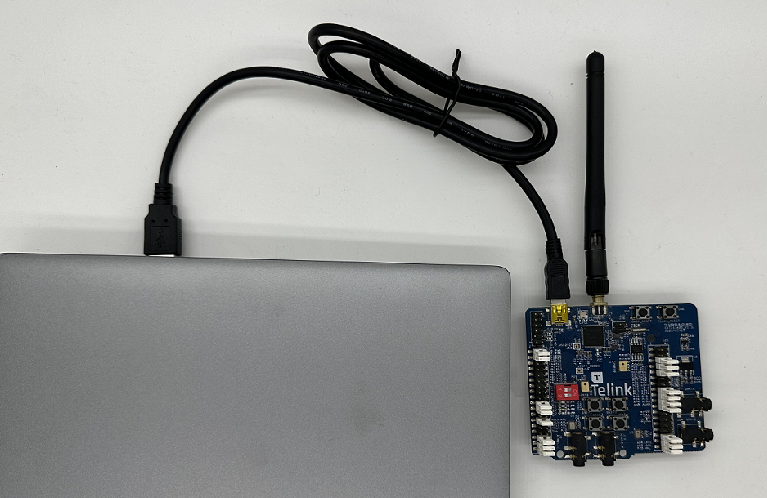
As shown in the picture, directly plug the FTD Joiner into the USB port of the Linux machine.
After connecting the FTD Joiner Device to the Linux machine, Open PuTTY. Then create a new terminal, set the serial port information, and open the serial port.
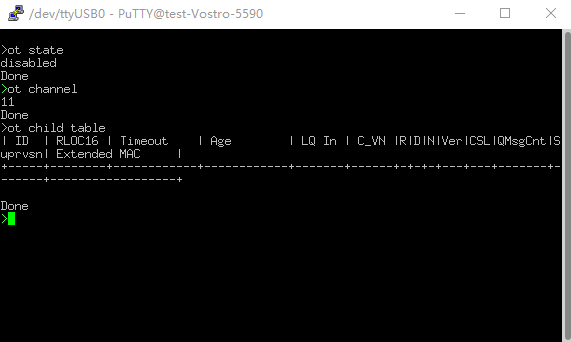
The OpenThread command line reference is here: OpenThread CLI Reference. Be sure to prefix all commands with ot.
Examples:
> ot state
disabled
Done
> ot channel
11
Done
>
5. Set up the Raspberry Pi as a OpenThread Border Router
An OpenThread Border Router is a device consisting of two main parts:
- Raspberry Pi contains all the services and firmware required to act as a Border Router (BR).
- RCP is responsible for Thread communication.
Radio Co-Processor(RCP)
To flash the ot-rcp firmware, follow the same steps as the ot-cli-ftd firmware flashing process. Connect the B91 Development Board to a USB port on the Raspberry Pi, as depicted in the figure below.
Raspberry Pi
- Ensure that the Raspbian Bullseye Lite OS image or Raspbian Bullseye with Desktop is properly written to the SD card.
- You have the option to either SSH into the Raspberry Pi or work directly with the Raspbian Desktop. This codelab will use SSH.
- Before proceeding to install OTBR Docker in the next step, make sure to update the local repository and package manager first.
$ sudo apt-get update
$ sudp apt-get upgrade
Install Docker
If you just update the local repository and package manager APT at previous step, reboot Raspberry Pi and then open an SSH terminal window.
- Install Docker:
$ curl -sSL https://get.docker.com | sh
- Put the current account into a Docker group to grant the permission so that
sudodoes not need to be added in front of each command.$ sudo usermod -aG docker $USER
- If Docker has not started, start it:
$ sudo dockerd
- The OTBR firewall scripts generate rules inside the Docker container. Prior to that, execute
modprobeto load the kernel module of iptables.$ sudo modprobe ip6table_filter
Configure and Run Docker
This codelab directly pulls the OTBR Docker image from the OpenThread Docker Hub. This image has been tested and verified by the OpenThread team.
- Pull the latest image:
$ docker pull openthread/otbr:latest
- Check the image list in the Docker container:
$ docker images
REPOSITORY        TAG       IMAGE ID       CREATED      SIZE
openthread/otbr   latest    db081f4de15f   6 days ago   766MB
- Determine the serial port name of the RCP device by checking
/dev,ttyACM0indicates that the RCP is correctly connected.$ ls /dev/tty* ... /dev/ttyACM0 ...
- Run OTBR Docker for the first time, and reference the serial port of RCP (
ttyACM0). If you want to continue using this OTBR Docker, use the command docker start otbr.$ docker run --name "otbr" --sysctl "net.ipv6.conf.all.disable_ipv6=0 net.ipv4.conf.all.forwarding=1 net.ipv6.conf.all.forwarding=1" -p 8080:80 --dns=127.0.0.1 -it --volume /dev/ttyACM0:/dev/ttyACM0 --privileged openthread/otbr --radio-url spinel+hdlc+uart:///dev/ttyACM0
- Open a new SSH terminal window to test the connectivity between the Raspberry Pi and the RCP.
$ docker exec -ti otbr sh -c "sudo ot-ctl"
> state
disabled
Done
Optional docker commands:
- Get information about the running Docker container:
$ docker ps -aq
- Stop OTBR Docker:
$ docker stop otbr
- Remove OTBR Docker:
$ docker rm otbr
- Reload OTBR Docker:
$ docker restart otbr
At this point, a FTD Joiner device and an OTBR are ready, and you can proceed to the next step to build the Thread network.
6. Create a Thread Network
Create a Thread Network on RCP
We use the ot-ctl shell on the OTBR to establish a Thread network. If you exited the shell in last section, enter the following command to start it again in the SSH terminal:
$ docker exec -ti otbr sh -c "sudo ot-ctl"
Next, enter the commands in the order specified in the table, and ensure that each step achieves the expected result before proceeding to the next one.
Index | Command | Introduction | Expected Response | ||
1 |
| Create a new random network dataset. | Done | ||
2 |
| Commit new dataset to the Active Operational Dataset in non-volatile storage. | Done | ||
3 |
| Bring up the IPv6 interface. | Done | ||
4 |
| Enable Thread protocol operation and attach to a Thread network. | Done | ||
Wait 10 seconds for the thread interface to be up. | |||||
5 |
| Check the device state.This command can be called multiple times until it becomes the leader and moves on to the next step. | leader | ||
6 |
| Check the complete Active Operational Dataset and record network key. | Active Timestamp: 1 | ||
The network key randomly generated by OTBR during network creation will be used when ot-cli-ftd devices join this Thread network.
Add the FTD Joiner to Thread through out-of-band commissioning
Out-of-band commissioning refers to the transmission of network credentials to devices waiting to join the network through non-wireless methods (for example, manually entering in the OpenThread CLI). Enter the following commands in order in the serial console to the FTD Joiner.
Index | Command | Introduction | Expected Responses | ||
1 |
| Only the Network Key is necessary for a device to connect to a Thread network. | Done | ||
2 |
| Commit new dataset to the Active Operational Dataset in non-volatile storage. | Done | ||
3 |
| Bring up the IPv6 interface. | Done | ||
4 |
| Enable Thread protocol operation and attach to a Thread network. | Done | ||
Wait 20 seconds while the device joins and configures itself. | |||||
5 |
| Check the device state. | child/router | ||
Topology
Enter commands such as ipaddr, child table, router table in the SSH terminal to get responses like the following code snippets.
> ipaddr rloc
fd8c:60bc:a98:c7ba:0:ff:fe00:b000
Done
> child table
| ID  | RLOC16 | Timeout    | Age        | LQ In | C_VN |R|D|N|Ver|CSL|QMsgCnt|Suprvsn| Extended MAC     |
+-----+--------+------------+------------+-------+------+-+-+-+---+---+-------+-------+------------------+
|   1 | 0xb001 |        240 |         23 |     3 |   51 |1|1|1|  3| 0 |     0 |   129 | 82bc12fbe783468e |

Done
> router table
| ID | RLOC16 | Next Hop | Path Cost | LQ In | LQ Out | Age | Extended MAC     | Link |
+----+--------+----------+-----------+-------+--------+-----+------------------+------+
| 44 | 0xb000 |       63 |         0 |     0 |      0 |   0 | 7ae354109d611f7e |    0 |

Done
...
> child table
| ID  | RLOC16 | Timeout    | Age        | LQ In | C_VN |R|D|N|Ver|CSL|QMsgCnt|Suprvsn| Extended MAC     |
+-----+--------+------------+------------+-------+------+-+-+-+---+---+-------+-------+------------------+

Done
> router table
| ID | RLOC16 | Next Hop | Path Cost | LQ In | LQ Out | Age | Extended MAC     | Link |
+----+--------+----------+-----------+-------+--------+-----+------------------+------+
| 33 | 0x8400 |       63 |         0 |     3 |      3 |  13 | e61487c1cda940a6 |    1 |
| 44 | 0xb000 |       63 |         0 |     0 |      0 |   0 | 7ae354109d611f7e |    0 |

Done
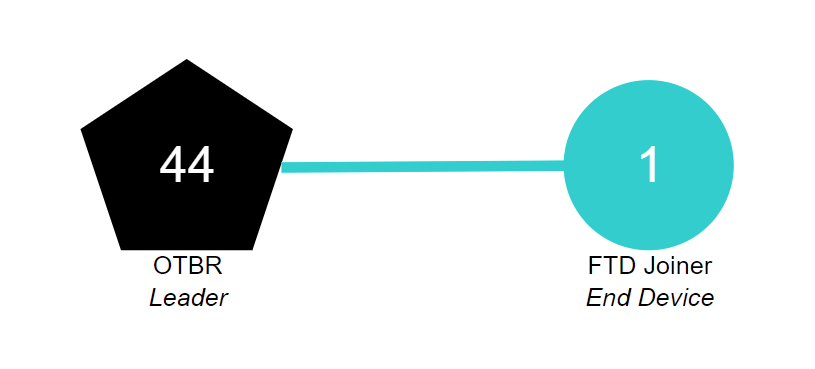
The RLOC16 of OTBR is 0xb000 and the RLOC16 of the FTD Joiner initially is 0xb001. Then the FTD Joiner's RLOC16 becomes 0x8400 after obtaining the Router ID. It can be seen that the FTD Joiner has been upgraded from a child to a router.
The current Thread network contains two nodes, and the topology is as shown in the figure below.
7. Communication Between Thread Devices
ICMPv6 Communication
We use the ping command to check whether Thread devices in the same network can communicate with each other. First, use the ipaddr command to get the RLOC of the device.
> ipaddr
fd8c:60bc:a98:c7ba:0:ff:fe00:fc11
fdbd:7274:649c:1:1d19:9613:f705:a5af
fd8c:60bc:a98:c7ba:0:ff:fe00:fc10
fd8c:60bc:a98:c7ba:0:ff:fe00:fc38
fd8c:60bc:a98:c7ba:0:ff:fe00:fc00
fd8c:60bc:a98:c7ba:0:ff:fe00:b000       # Routing Locator (RLOC)
fd8c:60bc:a98:c7ba:5249:34ab:26d1:aff6
fe80:0:0:0:78e3:5410:9d61:1f7e
Done
Enter the following command in the serial console of the FTD Joiner to execute the ping operation.
> ot ping fd8c:60bc:a98:c7ba:0:ff:fe00:b000
16 bytes from fd8c:60bc:a98:c7ba:0:ff:fe00:b000: icmp_seq=1 hlim=64 time=19ms
1 packets transmitted, 1 packets received. Packet loss = 0.0%. Round-trip min/avg/max = 19/19.0/19 ms.
Done
The output response of the serial port indicates that the OTBR side has received the ping request, and the FTD Joiner has received the ping response returned by OTBR. The communication between the two devices is successful.
UDP Communication
The application services provided by OpenThread also include UDP. You can use the UDP API to pass information between nodes in the Thread network, or pass information to external networks through the Border Router. The detailed introduction of OpenThread's UDP API is in the OpenThread CLI - UDP Example. This codelab will use some of the APIs in it to transmit information between OTBR and FTD Joiner.
First, get the Mesh-Local EID of OTBR. This address is also one of the IPv6 addresses of the Thread device, and it can be used to access Thread devices in the same Thread network partition.
> ipaddr mleid
fd8c:60bc:a98:c7ba:5249:34ab:26d1:aff6
Done
Enter the following commands in the SSH terminal to enable OTBR UDP and bind the device's 1022 port.
> udp open
Done
> udp bind :: 1022
Done
Enter the following commands in the serial console and enable the UDP of the FTD Joiner. Bind the device's 1022 port, and then send a 5-byte hello message to OTBR.
> ot udp open
Done
> ot udp bind :: 1022
Done
> ot udp send fd8c:60bc:a98:c7ba:5249:34ab:26d1:aff6 1022 hello
Done
The SSH terminal outputs the following information. OTBR receives the hello message from the FTD Joiner, which means the UDP communication is successful.
> 5 bytes from fd8c:60bc:a98:c7ba:9386:63cf:19d7:5a61 1022 hello
8. Congratulations
You've create a simple Thread network and verified the communication within this network.
You now know:
- How to build and use the Telink Zephyr development environment.
- How to build the
ot-cli-ftdandot-rcpbinaries, as well as flash them onto Telink B91 Development Boards. - How to set up a Raspberry Pi 3B+ or higher version as an OpenThread Border Router (OTBR) using Docker.
- How to create a Thread network on OTBR.
- How to add devices to the Thread network through out-of-band commissioning.
- How to verify the connectivity between nodes in the Thread network.
Further Reading
Check out openthread.io and GitHub to learn about various OpenThread resources, including:
- Supported Platforms — discover all the platforms that support OpenThread
- Build OpenThread — further details on building and configuring OpenThread
- Thread Primer — covers all the Thread concepts featured in this codelab
Reference documents: