
1. Introduction
What is Thread?
Thread is an IP-based low-power wireless mesh networking protocol that enables secure device-to-device and device-to-cloud communications. Thread networks can adapt to topology changes to avoid single-point failures.
What is OpenThread?
OpenThread released by Google is an open-source implementation of Thread®.
What is a Thread Border Router?
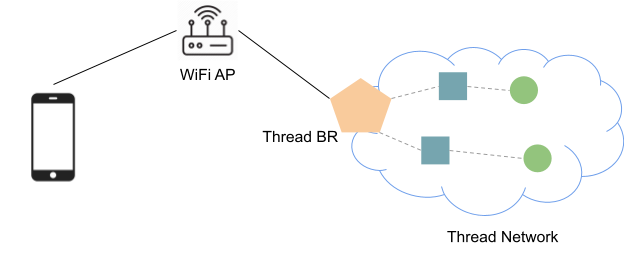
A Thread Border Router connects a Thread network to other IP-based networks, such as Wi-Fi or Ethernet. A Thread network requires a Border Router to connect to other networks. A Thread Border Router minimally supports the following functions:
- Bidirectional IP connectivity between Thread and Wi-Fi/Ethernet networks.
- Bidirectional service discovery via mDNS (on Wi-Fi/Ethernet link) and SRP (on Thread network).
- Thread-over-infrastructure that merges Thread partitions over IP-based links.
- External Thread Commissioning (for example, a mobile phone) to authenticate and join a Thread device to a Thread network.
OpenThread Border Router (OTBR) released by Google is an open-source implementation of the Thread Border Router.
What you'll build
In this codelab, you're going to set up a Thread Border Router and connect your mobile phone to a Thread End Device via the Border Router.
What you'll learn
- How to set up OTBR
- How to form a Thread network with OTBR
- How to build an OpenThread CLI device with the SRP feature
- How to register a service with SRP
- How to discover and reach a Thread end device
What you'll need
- A Linux workstation, for building and flashing a Thread RCP, the OpenThread CLI, and testing IPv6 multicast.
- A Raspberry Pi for the Thread border router.
- 2 Nordic Semiconductor nRF52840 USB Dongles (one for the RCP and one for the Thread end device).
- An iOS phone with at least iOS 14 or Android phone with at least Android 8.1.
2. Set Up OTBR
The quickest way to set up an OTBR is by following the OTBR Setup Guide.
After OTBR setup is complete, use ot-ctl to validate that the OTBR is acting as a Thread leader.
$ sudo ot-ctl state
leader
Done
Also validate that the OTBR has automatically configured an off-mesh-routable (OMR) prefix in the Thread Network Data.
$ sudo ot-ctl netdata show
Prefixes:
Prefixes:
fd76:a5d1:fcb0:1707::/64 paos med 4000
Routes:
fd49:7770:7fc5:0::/64 s med 4000
Services:
44970 5d c000 s 4000
44970 01 9a04b000000e10 s 4000
Done
$ sudo ot-ctl ipaddr
fda8:5ce9:df1e:6620:0:ff:fe00:fc11
fda8:5ce9:df1e:6620:0:0:0:fc38
fda8:5ce9:df1e:6620:0:ff:fe00:fc10
fd76:a5d1:fcb0:1707:f3c7:d88c:efd1:24a9
fda8:5ce9:df1e:6620:0:ff:fe00:fc00
fda8:5ce9:df1e:6620:0:ff:fe00:4000
fda8:5ce9:df1e:6620:3593:acfc:10db:1a8d
fe80:0:0:0:a6:301c:3e9f:2f5b
Done
3. Set Up SRP Client End Device
Build and flash OT CLI
Follow step 5 of the Build a Thread network with nRF52840 boards and OpenThread codelab to build and flash an nRF52840 CLI end device.
But instead of having OT_COMMISSIONER and OT_JOINER enabled, the CLI node requires OT_SRP_CLIENT and OT_ECDSA features.
So the full build invocation should look like this:
$ script/build nrf52840 USB_trans -DOT_SRP_CLIENT=ON -DOT_ECDSA=ON
Join the Thread network
To join the Thread network, we need to get the Active Operational Dataset from the OTBR device. Let's go back to ot-ctl and get the active dataset:
$ sudo ot-ctl dataset active -x
0e080000000000010000000300001235060004001fffe002083d3818dc1c8db63f0708fda85ce9df1e662005101d81689e4c0a32f3b4aa112994d29692030f4f70656e5468726561642d35326532010252e204103f23f6b8875d4b05541eeb4f9718d2f40c0302a0ff
Done
Return to the SRP client node screen session and set the active dataset:
> dataset set active 0e080000000000010000000300001235060004001fffe002083d3818dc1c8db63f0708fda85ce9df1e662005101d81689e4c0a32f3b4aa112994d29692030f4f70656e5468726561642d35326532010252e204103f23f6b8875d4b05541eeb4f9718d2f40c0302a0ff
Done
Then, start the Thread interface:
> ifconfig up
Done
> thread start
Done
Wait for a few seconds and verify if joining the Thread network is successful:
> state
child
Done
> netdata show
Prefixes:
fd76:a5d1:fcb0:1707::/64 paos med 4000
Routes:
fd49:7770:7fc5:0::/64 s med 4000
Services:
44970 5d c000 s 4000
44970 01 9a04b000000e10 s 4000
Done
> ipaddr
fd76:a5d1:fcb0:1707:d3dc:26d3:f70b:b927
fda8:5ce9:df1e:6620:0:ff:fe00:4001
fda8:5ce9:df1e:6620:ed74:123:cc5d:74ba
fe80:0:0:0:d4a9:39a0:abce:b02e
Done
Make sure that the network data matches the one printed on OTBR. We can now ping OTBR's OMR address:
> ping fd76:a5d1:fcb0:1707:f3c7:d88c:efd1:24a9
Done
> 16 bytes from fd76:a5d1:fcb0:1707:f3c7:d88c:efd1:24a9: icmp_seq=1 hlim=64 time=49ms
4. Publish the Service on the End Device
mDNS has been widely used for publishing DNS-SD service on link-local. But multicast messages consume too much bandwidth and will exhaust the battery for low power devices quickly. Thread uses the unicast SRP protocol to register their services with the Border Router and relies on the Border Router to advertise the services on the Wi-Fi or Ethernet link.
We can register a service with the srp client command.
Go to the SRP client node screen session and auto-start the SRP client:
> srp client autostart enable
Done
Set the hostname that will be advertised on the Wi-Fi/Ethernet link:
> srp client host name ot-host
Done
For a device on the Wi-Fi/Ethernet link to reach a Thread end device, the OMR address of the end device needs to be advertised:
> srp client host address fd76:a5d1:fcb0:1707:d3dc:26d3:f70b:b927
Done
At the end, register a fake _ipps._tcp service:
> srp client service add ot-service _ipps._tcp 12345
Done
Wait a few seconds and we should be able to see the service registered:
> srp client service
instance:"ot-service", name:"_ipps._tcp", state:Registered, port:12345, priority:0, weight:0
Done
We have completed all setup work and the _ipps._tcp service should have been advertised on the Wi-Fi/Ethernet link. It's time to discover and reach the end device now!
5. Discover the Service
Discover the service with a mobile phone
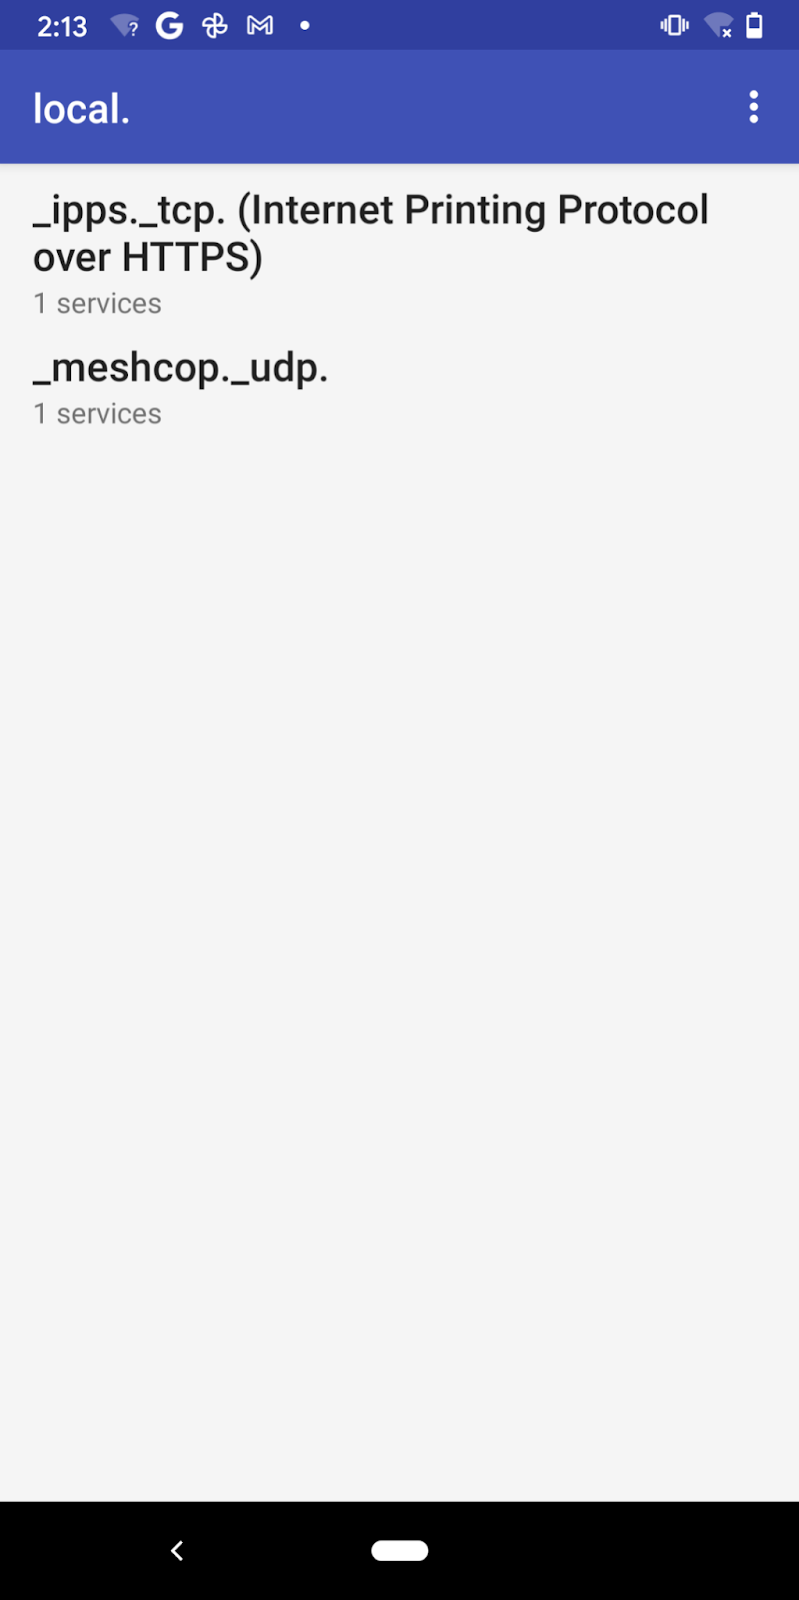
We use the Service Browser App to discover mDNS services with the Android phone, an equivalent App can also be found for iOS mobile devices. Open the App and the service _ipps._tcp should just show up.
Discover the service with a Linux host
If you want to discover the service from another Linux host, you can use the avahi-browse command.
Install avahi-daemon and avahi-utils:
$ sudo apt-get install -y avahi-daemon avahi-utils
Resolve the service:
$ sudo service avahi-daemon start # Ensure the avahi daemon is started.
$ avahi-browse -r _ipps._tcp
+ wlan0 IPv6 ot-service                                    Secure Internet Printer local
= wlan0 IPv6 ot-service                                    Secure Internet Printer local
   hostname = [ot-host.local]
   address = [fd76:a5d1:fcb0:1707:d3dc:26d3:f70b:b927]
   port = [12345]
   txt = []
...
Discover the service with a macOS host
You can use dns-sd on macOS to resolve the service:
$ dns-sd -Z _ipps._tcp local.
Browsing for _ipps._tcp.local.
DATE: ---Sun 14 Mar 2021---
21:31:42.125  ...STARTING...

; To direct clients to browse a different domain, substitute that domain in place of '@'
lb._dns-sd._udp                                 PTR     @

; In the list of services below, the SRV records will typically reference dot-local Multicast DNS names.
; When transferring this zone file data to your unicast DNS server, you'll need to replace those dot-local
; names with the correct fully-qualified (unicast) domain name of the target host offering the service.

_ipps._tcp                                      PTR     ot-service._ipps._tcp
ot-service._ipps._tcp                           SRV     0 0 12345 ot-host.local. ; Replace with unicast FQDN of target host
ot-service._ipps._tcp                           TXT     ""
...
6. Ping the End Device
Ping from a mobile phone
Take the Pixel phone as an example, we can find out the OMR address of the previously registered service "ot-service" in the details page of the service instance in the Service Browser App.

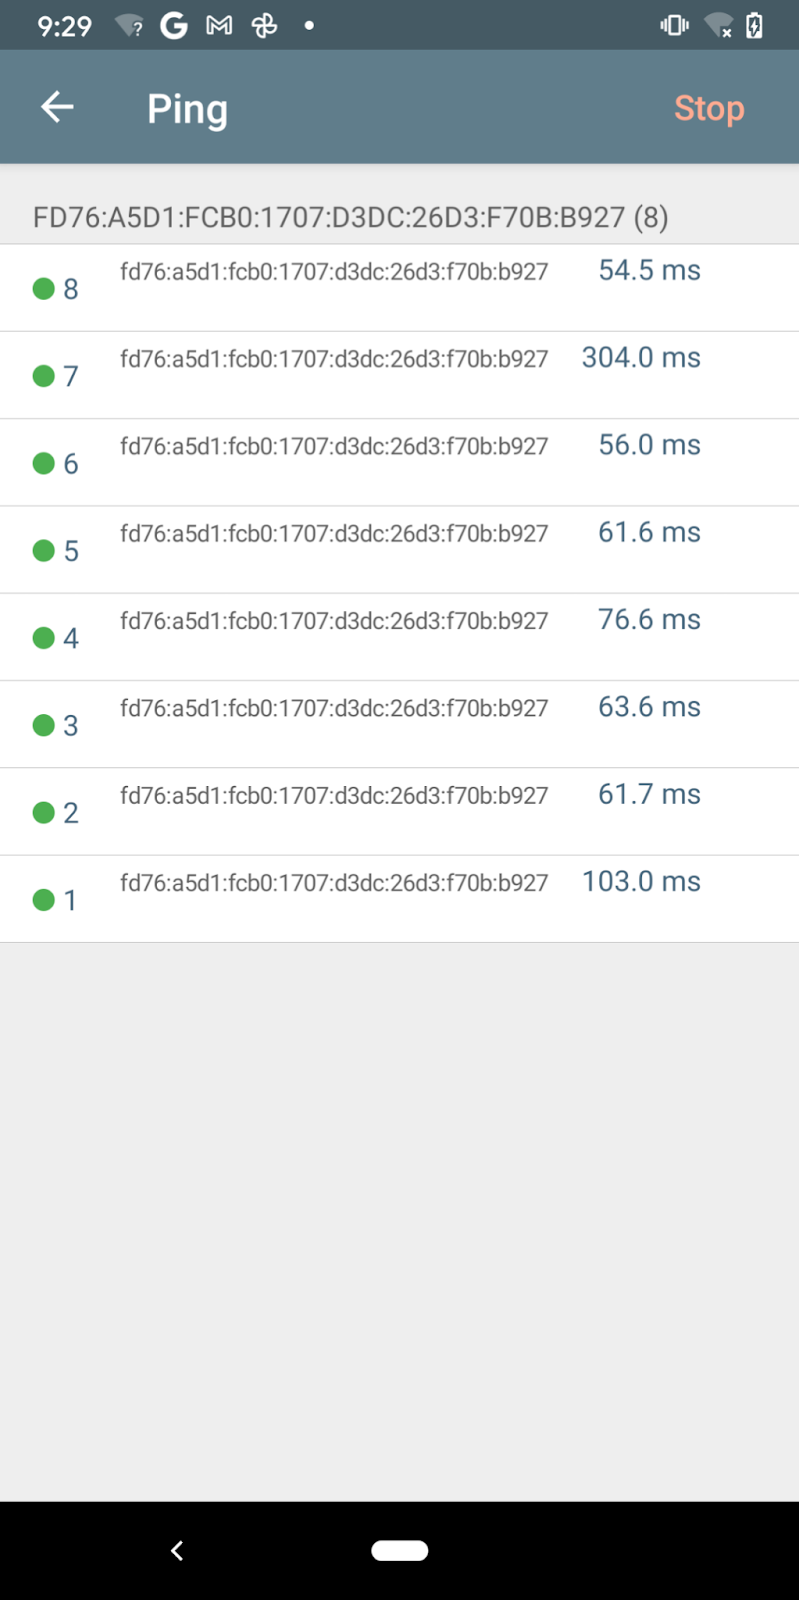
We can now ping the OMR address with another Network Analyzer App.
Unfortunately, the Android version of the Network Analyzer App doesn't support mDNS queries for the ping utility and we cannot ping the hostname ot-host.local directly (we can ping the hostname with the iOS version of the App).
Ping from a Linux/macOS host
Thread Border Router sends ICMPv6 Router Advertisements (RA) to advertise prefixes (via Prefix Information Option) and routes (via Route Information Option) on the Wi-Fi/Ethernet link.
Prepare Linux host
It is important to make sure that RA and RIO are enabled on your host:
net.ipv6.conf.wlan0.accept_rashould be at least1if ip forwarding is not enabled, and2otherwise.net.ipv6.conf.wlan0.accept_ra_rt_info_max_plenshould not be smaller than64.
the accept_ra is defaulted to 1 for most distributions. But there may be other network daemons which will override this option (for example, dhcpcd on Raspberry Pi will override accept_ra to 0). You can check the accept_ra value with:
$ sudo sysctl -n net.ipv6.conf.wlan0.accept_ra
0
And set the value to 1 (or 2 in case IP forwarding is enabled) with:
$ sudo sysctl -w net.ipv6.conf.wlan0.accept_ra=1
Net.ipv6.conf.wlan0.accept_ra = 1
The accept_ra_rt_info_max_plen option on most Linux distributions is default to 0, set it to 64 with:
$ sudo sysctl -w net.ipv6.conf.wlan0.accept_ra_rt_info_max_plen=64
net.ipv6.conf.wlan0.accept_ra_rt_info_max_plen = 64
The change will be lost after rebooting the host. For example, append below commands to /etc/sysctl.conf to permanently enable RIO:
$ net.ipv6.conf.wlan0.accept_ra_rt_info_max_plen = 64
It may be too late to change those configurations because the OTBR has already been sending RA messages and the interval between two unsolicited RA messages could be several hundred seconds. One way is to disconnect and reconnect to Wi-Fi AP to send Router Solicitation messages so that OTBR will respond with solicited RAs. Another option is to restart the Border Routing function on the Border Router:
$ sudo ot-ctl br disable
Done
$ sudo ot-ctl br enable
Done
If you are trying to reconnect Wi-Fi or restart Ethernet interface, make sure that dhcpcd is not used for managing your WiFi-/Ethernet IPv6 network. Because dhcpcd always overrides the accept_ra option everytime the interface is restarted and your accept_ra configuration will be lost. Append below lines to the dhcpcd configuration file (e.g. /etc/dhcpcd.conf) to explicitly disable IPv6 in dhcpcd:
noipv6
noipv6rs
You need to reboot to take the change into effect.
Prepare macOS host
Both accept_ra* options are enabled by default, but you need to upgrade your system to at least macOS Big Sur.
Ping the hostname or IPv6 address
We can now ping the hostname ot-host.local with command ping -6 (ping6 for macOS):
$ ping -6 ot-host.local.
PING ot-host.local.(fd76:a5d1:fcb0:1707:d3dc:26d3:f70b:b927 (fd76:a5d1:fcb0:1707:d3dc:26d3:f70b:b927)) 56 data bytes
64 bytes from fd76:a5d1:fcb0:1707:d3dc:26d3:f70b:b927 (fd76:a5d1:fcb0:1707:d3dc:26d3:f70b:b927): icmp_seq=1 ttl=63 time=170 ms
64 bytes from fd76:a5d1:fcb0:1707:d3dc:26d3:f70b:b927 (fd76:a5d1:fcb0:1707:d3dc:26d3:f70b:b927): icmp_seq=2 ttl=63 time=64.2 ms
64 bytes from fd76:a5d1:fcb0:1707:d3dc:26d3:f70b:b927 (fd76:a5d1:fcb0:1707:d3dc:26d3:f70b:b927): icmp_seq=3 ttl=63 time=22.8 ms
64 bytes from fd76:a5d1:fcb0:1707:d3dc:26d3:f70b:b927 (fd76:a5d1:fcb0:1707:d3dc:26d3:f70b:b927): icmp_seq=4 ttl=63 time=37.7 ms
64 bytes from fd76:a5d1:fcb0:1707:d3dc:26d3:f70b:b927 (fd76:a5d1:fcb0:1707:d3dc:26d3:f70b:b927): icmp_seq=5 ttl=63 time=28.7 ms
...
This command may fail on Linux hosts with the "Name or service not known" error. That's because the ping command is not resolving the ot-host.local. name with mDNS queries. Open /etc/nsswitch.conf and add mdns6_minimal to the line starts with hosts:
hosts: files mdns4_minimal mdns6_minimal dns
Of course, you can always ping the IPv6 address directly:
$ ping -6 fd76:a5d1:fcb0:1707:d3dc:26d3:f70b:b927
PING fd76:a5d1:fcb0:1707:d3dc:26d3:f70b:b927(fd76:a5d1:fcb0:1707:d3dc:26d3:f70b:b927) 56 data bytes
64 bytes from fd76:a5d1:fcb0:1707:d3dc:26d3:f70b:b927: icmp_seq=1 ttl=63 time=32.9 ms
64 bytes from fd76:a5d1:fcb0:1707:d3dc:26d3:f70b:b927: icmp_seq=2 ttl=63 time=27.8 ms
64 bytes from fd76:a5d1:fcb0:1707:d3dc:26d3:f70b:b927: icmp_seq=3 ttl=63 time=29.9 ms
64 bytes from fd76:a5d1:fcb0:1707:d3dc:26d3:f70b:b927: icmp_seq=4 ttl=63 time=73.5 ms
64 bytes from fd76:a5d1:fcb0:1707:d3dc:26d3:f70b:b927: icmp_seq=5 ttl=63 time=26.4 ms
...
7. End Device Unpublish the Service
To remove the address and service registered from the SRP client node:
> srp client host remove
Done
You should not be able to discover the _ipps._tcp service now.
8. Congratulations
Congratulations, you've successfully set up OTBR as a Thread Border Router to provide bidirectional IP connectivity and service discovery for Thread end devices.
What's next?
Check out some of these codelabs...