
1. Introduction

OpenThread released by Google is an open-source implementation of the Thread networking protocol. Google Nest has released OpenThread to make the technology used in Nest products broadly available to developers to accelerate the development of products for the connected home.
The Thread specification defines an IPv6-based reliable, secure and low-power wireless device-to-device communication protocol for home applications. OpenThread implements all Thread networking layers including IPv6, 6LoWPAN, IEEE 802.15.4 with MAC security, Mesh Link Establishment, and Mesh Routing.
This Codelab walks you through simulating a Thread network on simulated devices.
What you'll learn
- How to set up the OpenThread build toolchain
- How to simulate a Thread network
- How to authenticate Thread nodes
- How to manage a Thread network with OpenThread Daemon
What you'll need
- git
- Basic knowledge of Linux, network routing
2. Set up the build system
Git
Git is required to complete this Codelab. Download and install it before continuing.
Once installed, follow the instructions for your specific OS to download and build OpenThread.
XCode for Mac OS X
XCode is required to install and build OpenThread on Mac OS X.
After XCode is installed, install the XCode Command Line Tools:
$ xcode-select --install
Build on Linux / Mac OS X
These installation instructions have been tested on Ubuntu Server 14.04 LTS and Mac OS X Sierra 10.12.6.
Install OpenThread. The bootstrap commands make sure the toolchain is installed and the environment is properly configured:
$ mkdir -p ~/src
$ cd ~/src
$ git clone --recursive https://github.com/openthread/openthread.git
$ cd openthread
$ ./script/bootstrap
Using Windows
If you prefer Windows, we recommend trying the Docker version of this Codelab.
3. Build the OpenThread applications
Once your installation is complete, build the example OpenThread application. For this Codelab we are using the simulation example.
$ cd ~/src/openthread
$ ./script/cmake-build simulation
Now build OpenThread Daemon:
$ ./script/cmake-build posix -DOT_DAEMON=ON
4. Simulate a Thread network
The example application you'll use for this Codelab demonstrates a minimal OpenThread application that exposes the OpenThread configuration and management interfaces via a basic command-line interface (CLI).
This exercise takes you through the minimal steps required to ping one simulated Thread device from another simulated Thread device.
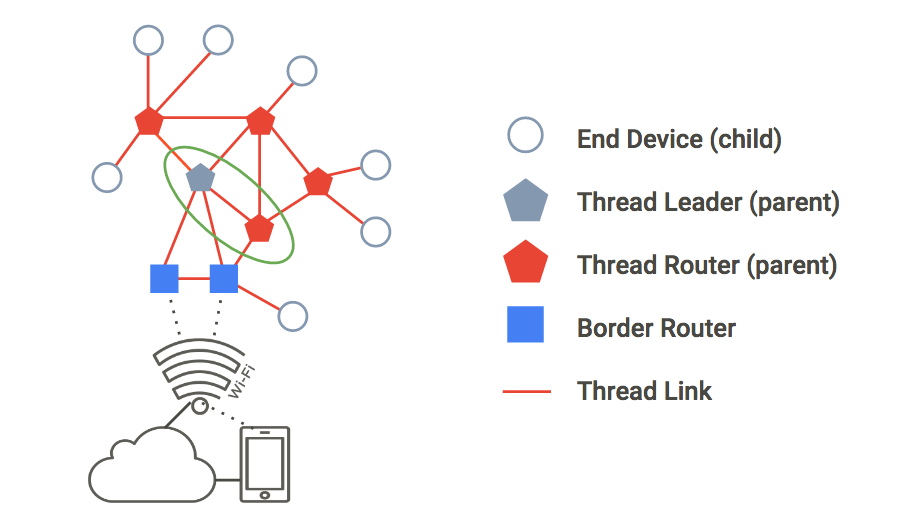
The figure below describes a basic Thread network topology. For this exercise, we'll simulate the two nodes within the green circle: a Thread Leader and Thread Router with a single connection between them.
Ping a node
1. Start Node 1
Navigate to the openthread directory and spawn the CLI process for a simulated Thread device using the ot-cli-ftd binary.
$ cd ~/src/openthread
$ ./build/simulation/examples/apps/cli/ot-cli-ftd 1
Note: If you don't see the > prompt after running this command, press enter.
This binary implements an OpenThread device simulated on top of POSIX. The IEEE 802.15.4 radio driver is implemented on top of UDP (IEEE 802.15.4 frames are passed within UDP payloads).
The argument of 1 is a file descriptor that represents the least-significant bits of the "factory-assigned" IEEE EUI-64 for the simulated device. This value is also used when binding to a UDP port for IEEE 802.15.4 radio emulation (port = 9000 + file descriptor). Each instance of a simulated Thread device in this Codelab will use a different file descriptor.
Note: Only use file descriptors of 1 or greater as noted in this Codelab when spawning the process for a simulated device. A file descriptor of 0 is reserved for other use.
Create a new Operational Dataset and commit it as the active one. The Operational Dataset is the configuration for the Thread network you are creating.
> dataset init new
Done
> dataset
Active Timestamp: 1
Channel: 20
Channel Mask: 07fff800
Ext PAN ID: d6263b6d857647da
Mesh Local Prefix: fd61:2344:9a52:ede0/64
Network Key: e4344ca17d1dca2a33f064992f31f786
Network Name: OpenThread-c169
PAN ID: 0xc169
PSKc: ebb4f2f8a68026fc55bcf3d7be3e6fe4
Security Policy: 0, onrcb
Done
Commit this dataset as the active one:
> dataset commit active
Done
Bring up the IPv6 interface:
> ifconfig up
Done
Start Thread protocol operation:
> thread start
Done
Wait a few seconds and verify that the device has become the Thread Leader. The Leader is the device responsible for managing router ID assignment.
> state
leader
Done
View the IPv6 addresses assigned to Node 1's Thread interface (your output will be different):
> ipaddr
fd61:2344:9a52:ede0:0:ff:fe00:fc00
fd61:2344:9a52:ede0:0:ff:fe00:5000
fd61:2344:9a52:ede0:d041:c5ba:a7bc:5ce6
fe80:0:0:0:94da:92ea:1353:4f3b
Done
Note the specific IPv6 address types:
- Begins with
fd= mesh-local - Begins with
fe80= link-local
Mesh-local address types are classified further:
- Contains
ff:fe00= Router Locator (RLOC) - Does not contain
ff:fe00= Endpoint Identifier (EID)
Identify the EID in your console output make a note of it for later use. In the sample output above, the EID is:
fd61:2344:9a52:ede0:d041:c5ba:a7bc:5ce6
2. Start Node 2
Open a new terminal and navigate to the openthread directory and spawn the CLI process. This is your second simulated Thread device:
$ cd ~/src/openthread
$ ./build/simulation/examples/apps/cli/ot-cli-ftd 2
Note: If you don't see the > prompt after running this command, press enter.
Configure the Thread Network Key and PAN ID, using the same values as Node 1's Operational Dataset:
> dataset networkkey e4344ca17d1dca2a33f064992f31f786
Done
> dataset panid 0xc169
Done
Commit this dataset as the active one:
> dataset commit active
Done
Bring up the IPv6 interface:
> ifconfig up
Done
Start Thread protocol operation:
> thread start
Done
The device will initialize itself as a Child. A Thread Child is equivalent to an End Device, which is a Thread device that transmits and receives unicast traffic only with a Parent device.
> state
child
Done
Within 2 minutes you should see the state switch from child to router. A Thread Router is capable of routing traffic between Thread devices. It is also referred to as a Parent.
> state
router
Done
Verify the network
An easy way to verify the mesh network is to look at the router table.
1. Check connectivity
On Node 2, get the RLOC16. The RLOC16 is the last 16 bits of the device's RLOC IPv6 address.
> rloc16
5800
Done
On Node 1, check the router table for Node 2's RLOC16. Make sure Node 2 has switched to the router state first.
> router table
| ID | RLOC16 | Next Hop | Path Cost | LQI In | LQI Out | Age | Extended MAC  |
+----+--------+----------+----------+-------+---------+-----+------------------+
| 20 | 0x5000 |       63 |         0 |     0 |      0 |   0 | 96da92ea13534f3b |
| 22 | 0x5800 |       63 |         0 |     3 |      3 |  23 | 5a4eb647eb6bc66c |
Node 1's RLOC of 0xa800 is found in the table, confirming that it is connected to the mesh.
2. Ping Node 1 from Node 2
Verify connectivity between the two simulated Thread devices. In Node 2, ping the EID assigned to Node 1:
> ping fd61:2344:9a52:ede0:d041:c5ba:a7bc:5ce6
> 16 bytes from fd61:2344:9a52:ede0:d041:c5ba:a7bc:5ce6: icmp_seq=1
hlim=64 time=12ms
Press enter to return to the > CLI prompt.
Test the network
Now that you can successfully ping between two simulated Thread devices, test the mesh network by taking one node offline.
Return to Node 1 and stop Thread:
> thread stop
Done
Switch to Node 2 and check the state. Within two minutes, Node 2 detects that the leader (Node 1) is offline, and you should see Node 2 transition to be the leader of the network:
> state
router
Done
...
> state
leader
Done
Once confirmed, stop Thread and factory reset Node 2 before exiting. A factory reset is done to ensure that the Thread network credentials we used in this exercise are not carried over to the next exercise.
> thread stop
Done
> factoryreset
>
> exit
Also factory reset and exit Node 1:
> factoryreset
>
> exit
See the OpenThread CLI Reference to explore all available CLI commands.
5. Authenticate nodes with Commissioning
In the previous exercise, you set up a Thread network with two simulated devices and verified connectivity. However, this only allows unauthenticated IPv6 link-local traffic to pass between devices. To route global IPv6 traffic between them (and the Internet via a Thread border router), nodes must be authenticated.
In order to authenticate, one device must act as a Commissioner. The Commissioner is the currently elected authentication server for new Thread devices, and the authorizer for providing the network credentials required for the devices to join the network.
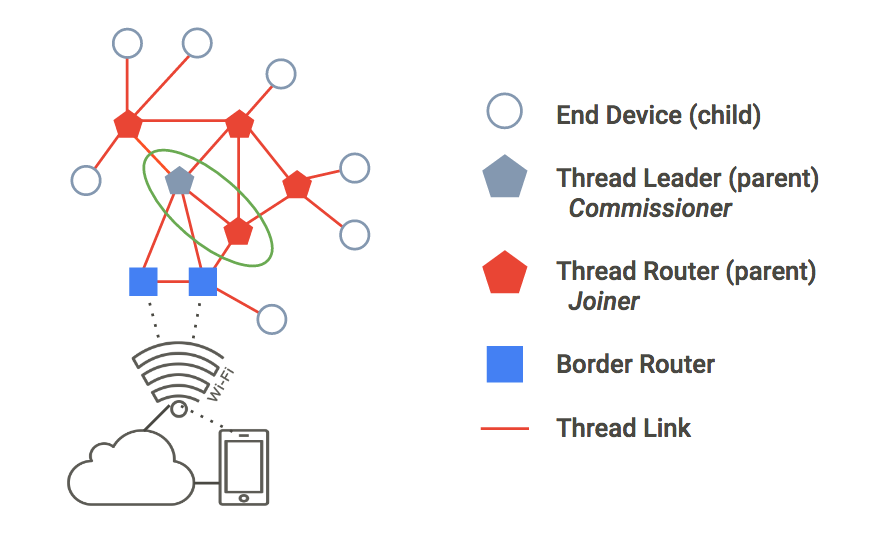
In this exercise, we will use the same two-node topology as before. For authentication, the Thread Leader will act as the Commissioner, the Thread Router as a Joiner.
1. Create a network
If continuing from the previous exercise, you should already have two terminal windows open. If not, make sure two are open and ready to use. One will serve as Node 1, the other as Node 2.
In Node 1, spawn the CLI process:
$ cd ~/src/openthread
$ ./build/simulation/examples/apps/cli/ot-cli-ftd 1
Note: If you don't see the > prompt after running this command, press enter.
Create a new Operational Dataset, commit it as the active one, and start Thread:
> dataset init new
Done
> dataset
Active Timestamp: 1
Channel: 12
Channel Mask: 07fff800
Ext PAN ID: e68d05794bf13052
Mesh Local Prefix: fd7d:ddf7:877b:8756/64
Network Key: a77fe1d03b0e8028a4e13213de38080e
Network Name: OpenThread-8f37
PAN ID: 0x8f37
PSKc: f9debbc1532487984b17f92cd55b21fc
Security Policy: 0, onrcb
Done
Commit this dataset as the active one:
> dataset commit active
Done
Bring up the IPv6 interface:
> ifconfig up
Done
Start Thread protocol operation:
> thread start
Done
Wait a few seconds and verify that the device has become a Thread Leader:
> state
leader
Done
2. Start the Commissioner role
While still on Node 1, start the Commissioner role:
> commissioner start
Done
Allow any Joiner (by using the * wildcard) with the J01NME Joiner Credential to commission onto the network. A Joiner is a device that is added by a human administrator to a commissioned Thread Network.
> commissioner joiner add * J01NME
Done
3. Start the Joiner role
In a second terminal window, spawn a new CLI process. This is Node 2.
$ cd ~/src/openthread
$ ./build/simulation/examples/apps/cli/ot-cli-ftd 2
On Node 2, enable the Joiner role using the J01NME Joiner Credential.
> ifconfig up
Done
> joiner start J01NME
Done
... wait a few seconds for confirmation ...
Join success
As a Joiner, the device (Node 2) has successfully authenticated itself with the Commissioner (Node 1) and received the Thread Network credentials.
Now that Node 2 is authenticated, start Thread:
> thread start
Done
4. Validate network authentication
Check the state on Node 2, to validate that it has now joined the network. Within two minutes, Node 2 transitions from child to router:
> state
child
Done
...
> state
router
Done
5. Reset configuration
To prepare for the next exercise, reset the configuration. On each Node, stop Thread, do a factory reset, and exit the simulated Thread device:
> thread stop
Done
> factoryreset
>
> exit
You may have to press enter a few times to bring the > prompt back after a factoryreset command.
6. Manage the network with OpenThread Daemon
For this exercise, we are going to simulate one CLI instance (a single embedded SoC Thread device) and one Radio Co-Processor (RCP) instance.
ot-daemon is a mode of the OpenThread Posix app that uses a UNIX socket as input and output, so that OpenThread core can run as a service. A client can communicate with this service by connecting to the socket using the OpenThread CLI as the protocol.
ot-ctl is a CLI provided by ot-daemon to manage and configure the RCP. Using this, we'll connect the RCP to the network created by the Thread device.
Use ot-daemon
This exercise will use three terminal windows, corresponding to the following:
- CLI instance of simulated Thread device (Node 1)
ot-daemonprocessot-ctlCLI instance
If continuing from the previous exercise you should already have two terminal windows open. Open a third to ensure you have three terminal windows available for this exercise.
1. Start Node 1
In the first terminal window, spawn the CLI process for your simulated Thread device:
$ cd ~/src/openthread
$ ./build/simulation/examples/apps/cli/ot-cli-ftd 1
Note: If you don't see the > prompt after running this command, press enter.
Create a new Operational Dataset, commit it as the active one, and start Thread:
> dataset init new
Done
> dataset
Active Timestamp: 1
Channel: 13
Channel Mask: 07fff800
Ext PAN ID: 97d584bcd493b824
Mesh Local Prefix: fd55:cf34:dea5:7994/64
Network Key: ba6e886c7af50598df1115fa07658a83
Network Name: OpenThread-34e4
PAN ID: 0x34e4
PSKc: 38d6fd32c866927a4dfcc06d79ae1192
Security Policy: 0, onrcb
Done
Commit this dataset as the active one:
> dataset commit active
Done
Bring up the IPv6 interface:
> ifconfig up
Done
Start Thread protocol operation:
> thread start
Done
View the IPv6 addresses assigned to Node 1's Thread interface:
> ipaddr
fd55:cf34:dea5:7994:0:ff:fe00:fc00
fd55:cf34:dea5:7994:0:ff:fe00:d000
fd55:cf34:dea5:7994:460:872c:e807:c4ab
fe80:0:0:0:9cd8:aab6:482f:4cdc
Done
>
As explained in the Simulate a Thread network step, one address is link-local (fe80) and three are mesh-local (fd). The EID is the mesh-local address that does not contain ff:fe00 in the address. In this sample output, the EID is fd55:cf34:dea5:7994:460:872c:e807:c4ab.
Identify the specific EID from your ipaddr output, which will be used to communicate with the node.
2. Start ot-daemon
In the second terminal window, navigate to the openthread directory, and start ot-daemon for an RCP node, which we'll call Node 2. Use the -v verbose flag so you can see log output and confirm that it is running, and make sure to use sudo:
$ cd ~/src/openthread
$ sudo ./build/posix/src/posix/ot-daemon -v \
    'spinel+hdlc+forkpty://build/simulation/examples/apps/ncp/ot-rcp?forkpty-arg=2'
When successful, ot-daemon in verbose mode generates output similar to the following:
ot-daemon[12463]: Running OPENTHREAD/thread-reference-20200818-1938-g0f10480ed; POSIX; Aug 30 2022 10:55:05
ot-daemon[12463]: Thread version: 4
ot-daemon[12463]: Thread interface: wpan0
ot-daemon[12463]: RCP version: OPENTHREAD/thread-reference-20200818-1938-g0f10480ed; SIMULATION; Aug 30 2022 10:54:10
Leave this terminal open and running in the background. You will not enter any further commands in it.
3. Use ot-ctl to join the network
We haven't commissioned Node 2 (the ot-daemon RCP) to any Thread network yet. This is where ot-ctl comes in. ot-ctl uses the same CLI as the OpenThread CLI app. Therefore, you can control ot-daemon nodes in the same manner as the other simulated Thread devices.
In a third terminal window, start ot-ctl:
$ sudo ./build/posix/src/posix/ot-ctl
>
Note: If you don't see the > prompt after running this command, press enter.
You'll use ot-ctl in this third terminal window to manage Node 2 (the RCP node) that you started in the second terminal window with ot-daemon. Check the state of Node 2:
> state
disabled
Done
Get Node 2's eui64, to restrict joining to the specific Joiner:
> eui64
18b4300000000001
Done
On Node 1 (first terminal window), start the Commissioner and restrict joining to only that eui64:
> commissioner start
Done
> commissioner joiner add 18b4300000000001 J01NME
Done
On Node 2 (third terminal window), bring up the network interface and join the network:
> ifconfig up
Done
> joiner start J01NME
Done
... wait a few seconds for confirmation ...
Join success
As a Joiner, the RCP (Node 2) has successfully authenticated itself with the Commissioner (Node 1) and received the Thread Network credentials.
Now join Node 2 to the Thread network:
> thread start
Done
4. Validate network authentication
Check the state on Node 2, to validate that it has now joined the network. Within two minutes, Node 2 transitions from child to router:
> state
child
Done
...
> state
router
Done
5. Validate connectivity
Quit ot-ctl by using either Ctrl+D or exit command, and on your host machine's command line, ping Node 1, using its EID with the ping6 command. If the ot-daemon RCP instance is successfully joined to and communicating with the Thread network, the ping succeeds:
$ ping6 -c 4 fd55:cf34:dea5:7994:460:872c:e807:c4ab
PING fd55:cf34:dea5:7994:460:872c:e807:c4ab (fd55:cf34:dea5:7994:460:872c:e807:c4ab): 56 data bytes
64 bytes from fd55:cf34:dea5:7994:460:872c:e807:c4ab: icmp_seq=0 ttl=64 time=4.568 ms
64 bytes from fd55:cf34:dea5:7994:460:872c:e807:c4ab: icmp_seq=1 ttl=64 time=6.396 ms
64 bytes from fd55:cf34:dea5:7994:460:872c:e807:c4ab: icmp_seq=2 ttl=64 time=7.594 ms
64 bytes from fd55:cf34:dea5:7994:460:872c:e807:c4ab: icmp_seq=3 ttl=64 time=5.461 ms
--- fd55:cf34:dea5:7994:460:872c:e807:c4ab ping statistics ---
4 packets transmitted, 4 packets received, 0% packet loss
round-trip min/avg/max/stddev = 4.568/6.005/7.594/1.122 ms
7. Congratulations!
You've successfully simulated your first Thread network using OpenThread. Awesome!
In this Codelab you learned how to:
- Set up the OpenThread build toolchain
- Simulate a Thread network
- Authenticate Thread nodes
- Manage a Thread network with OpenThread Daemon
If you want to learn more, explore these references: