To automate certification tests, additional setup is required.
All installation and configuration steps below occur on the Windows machine running the GRL Test Harness software. Download and install the latest GRL Thread Test Harness before continuing.
Once installed, there are two automation methods for the device under test (DUT):
OpenThread Harness Automation Tool
Install
- Install the following software:
- Python 2.7
- Git for Windows (Bash support is highly recommended)
- Clone the OpenThread repository to get the automation scripts:
git clone https://github.com/openthread/openthread - Install Python requirements:
cd tools/harness-automationpip install -r requirements.txt - Install both Google Chrome and ChromeDriver.
Configure
- Create a configuration file for the automation tool:
cp autothreadharness/settings_sample.py autothreadharness/settings.py - Update that new configuration file according to the instructions in the file.
- Add the following parameter to the Test Harness configuration file, found at
C:\GRL\Thread1.1\Config\Configuration.ini:BrowserAutoNavigate = False
Mixed testbed support
The Harness Automation Tool also supports mixed testbeds, where the reference devices used in each test case are a mixed set of devices rather than all the same device. For example, instead of using 32 TI CC2538 boards running OpenThread for all test cases, you could mix and match between all four Thread reference devices for each test case as desired.
To use mixed testbeds, additional configuration is necessary:
- Add the following additional parameter to the Test Harness configuration
file, found at
C:\GRL\Thread1.1\Config\Configuration.ini:EnableDeviceSelection = True
- Download the topology configuration file from the Thread
Group.
Add this file as
TopologyConfig.txttoC:\GRL\Thread1.1\Thread_Harness\TestScripts. This file details which reference device to use for each role in each test case.
The topology configuration file provided by the Thread Group can be modified for other mixed bed configurations, but for official certification the original configuration must be used.
Valid values to use for reference devices in the topology configuration file are:
| Value in topology configuration file | Test Harness reference device |
|---|---|
ARM |
ARM: NXP FRDM-K64F with Firefly 6LoWPAN Shield |
NXP |
NXP(Freescale): USB-KW24D512 Dongles |
OpenThread |
OpenThread: TI CC2538DK |
SiLabs |
Silabs: EM358x USB Stick |
Each test case entry in the topology configuration file must be on a separate
line and formatted in role:device pairs as follows:
5.3.10-Leader:NXP,Router_1:OpenThread,BorderRouter:OpenThread,MED_1:ARM
Test Harness Auto DUT mode
The GRL Test Harness software provides an advanced auto discovery feature (Auto DUT) which accelerates the validation process for Thread reference stack vendors.
OpenThread provides an example Thread Host Controller Interface (THCI) that allows the Test Harness to control your component or product as if it were one of the reference platforms. According to the serial port characteristics of your specific platform, your DUT could either:
Acting as the existing OpenThread reference platform
If the serial port of the DUT functions under settings of 115200 8-N-1, and the device responds correctly after every physical device reset (for example, to confirm the device's valid connection to the Windows machine), then the platform can use the OpenThread THCI tool. This tool allows the device to act as the OpenThread reference platform during testing.
- Close the GRL Test Harness, if it is open.
- Attach the device to the Windows machine.
- Find the device serial port hardware identifier, using the Python pySerial
module:
- Install pySerial on the Windows machine.
- Use Python on the Windows command line to enumerate all hardware
identifiers (VID and PID) for devices connected to the machine. In this
output, one device is connected with an identifier of VID=1366 and
PID=1015:
python -m serial.tools.list_ports -vCOM10desc: USB Serial Port (COM10)hwid: USB\VID_1366+PID_1015+MI_00 - If you know the COM port already, you can use a different command. For
example, if the COM port is
COM10:python -c "import serial.tools.list_ports;print [ports[2] for ports in serial.tools.list_ports.comports() if ports[0] == 'COM10']"['USB\VID_1366+PID_1015+MI_00']
- Update the Golden Device list:
- Open
C:\GRL\Thread1.1\Config\Configuration.ini. - Update the OpenThread group in the
GoldenDeviceHardwareIdsarray with the VID and PID of the device(s):GoldenDeviceHardwareIds = {
'NXP': ['VID:PID=1FC9:0300','VID:PID=15A2:0300','VID:PID=1366:1015'],
'SiLabs': 'VID:PID=10C4:8A5E',
'ARM': 'VID:PID=0D28:0204',
'OpenThread':['VID:PID=10C4:EA60','VID:PID=1366:1015']}
- Open
- Enable Auto DUT mode.
Acting as a new reference platform
If the serial port of the DUT does not function under the proper serial port settings, or the device does not respond correctly after a physical device reset (outputs unreadable code within 3-6 seconds of reset), then OpenThread THCI can be customized to treat the device as a new platform in the Test Harness.
For example, to customize THCI using the Nordic Semiconductor nRF52840 platform:
- Close the GRL Test Harness, if it is open.
Modify
/tools/harness-thci/OpenThread.pybased on the UART characteristics of the target device. Modifications may differ between target devices. In the case of the Nordic nRF52840 platform:- Rename the
OpenThread.pyfile tonRF52840.py. Change the first three occurrences of "OpenThread" to "nRF52840":
>> Device : nRF52840 THCI
>> Class : nRF52840

class nRF52840(IThci):
Change the serial port parameters:
def _connect(self):
    print 'My port is %s' % self.port
    if self.port.startswith('COM'):
        self.handle = serial.Serial(self.port, 115200, timeout=0)
        time.sleep(1)
        self.handle.write('\r\n')
        time.sleep(0.1)
        self._is_net = False
    elif ':' in self.port:
        host, port = self.port.split(':')
        self.handle = socket.create_connection((host, port))
        self.handle.setblocking(0)
        self._is_net = True
    else:
        raise Exception('Unknown port schema')
    self.UIStatusMsg = self.getVersionNumber()
Change the sleep time to eliminate the impact of unreadable code output after device reset:
def powerDown(self):
    """power down the Thread device"""
    print '%s call powerDown' % self.port
    self._sendline('reset')
    self.isPowerDown = True
    time.sleep(8)  # New addition

def reboot(self):
    """reset and rejoin to Thread Network without any timeout

    Returns:
        True: successful to reset and rejoin the Thread Network
        False: fail to reset and rejoin the Thread Network
    """
    print '%s call reboot' % self.port
    try:
        self._sendline('reset')
        self.isPowerDown = True
        time.sleep(8)  # Updated from 3 to 8

def reset(self):
    """factory reset"""
    print '%s call reset' % self.port
    try:
        self._sendline('factoryreset')
        time.sleep(8)  # Updated from 3 to 8
        self._read()

def resetAndRejoin(self, timeout):
    """reset and join back Thread Network with a given timeout delay

    Args:
        timeout: a timeout interval before rejoin Thread Network

    Returns:
        True: successful to reset and rejoin Thread Network
        False: fail to reset and rejoin the Thread Network
    """
    print '%s call resetAndRejoin' % self.port
    print timeout
    try:
        self._sendline('reset')
        self.isPowerDown = True
        time.sleep(timeout)
        if timeout < 8:      # Sleep a bit longer if the timeout is short
            time.sleep(8 - timeout)
- Rename the
Copy the modified
nRF52840.pyfile toC:\GRL\Thread1.1\Thread_Harness\THCIAdd the new platform information to the Test Harness:
- Create an icon (in png or jpg format) to make it easier to differentiate
your platform and copy it to
C:\GRL\Thread1.1\Web\images. Update
C:\GRL\Thread1.1\Web\data\deviceInputFields.xmlwith a newDEVICEsection, where thethumbnailparameter is the icon file:<DEVICE name="nRF52840" thumbnail="nRF52840.jpg" description ="nRF52840: Nordic" THCI="nRF52840"> <ITEM label="Serial Line" type="text" forParam="SerialPort" validation="COM" hint="eg: COM1">COM </ITEM> <ITEM label="Speed" type="text" forParam="SerialBaudRate" validation="baud-rate" hint="eg: 115200">115200 </ITEM> </DEVICE>
- Create an icon (in png or jpg format) to make it easier to differentiate
your platform and copy it to
Attach the device to the Windows machine.
Find the device serial port hardware identifier, using the Python pySerial module:
- Install pySerial on the Windows machine.
- Use Python on the Windows command line to enumerate all hardware
identifiers (VID and PID) for devices connected to the machine. In this
output, one device is connected with an identifier of VID=1366 and
PID=1015:
python -m serial.tools.list_ports -vCOM10desc: USB Serial Port (COM10)hwid: USB\VID_1366+PID_1015+MI_00 - If you know the COM port already, you can use a different command. For
example, if the COM port is
COM10:python -c "import serial.tools.list_ports;print [ports[2] for ports in serial.tools.list_ports.comports() if ports[0] == 'COM10']"['USB\VID_1366+PID_1015+MI_00']
Update the Golden Device list:
- Open
C:\GRL\Thread1.1\Config\Configuration.ini. - Add a new platform group in the
GoldenDeviceHardwareIdsarray with the VID and PID of the device:GoldenDeviceHardwareIds = {
'NXP': ['VID:PID=1FC9:0300','VID:PID=15A2:0300','VID:PID=1366:1015'],
'SiLabs': 'VID:PID=10C4:8A5E',
'ARM': 'VID:PID=0D28:0204',
'OpenThread':'VID:PID=10C4:EA60',
'nRF52840': 'VID:PID=1366:1015'}
- Open
Enable Auto DUT mode
After one of the two above configuration options are complete:
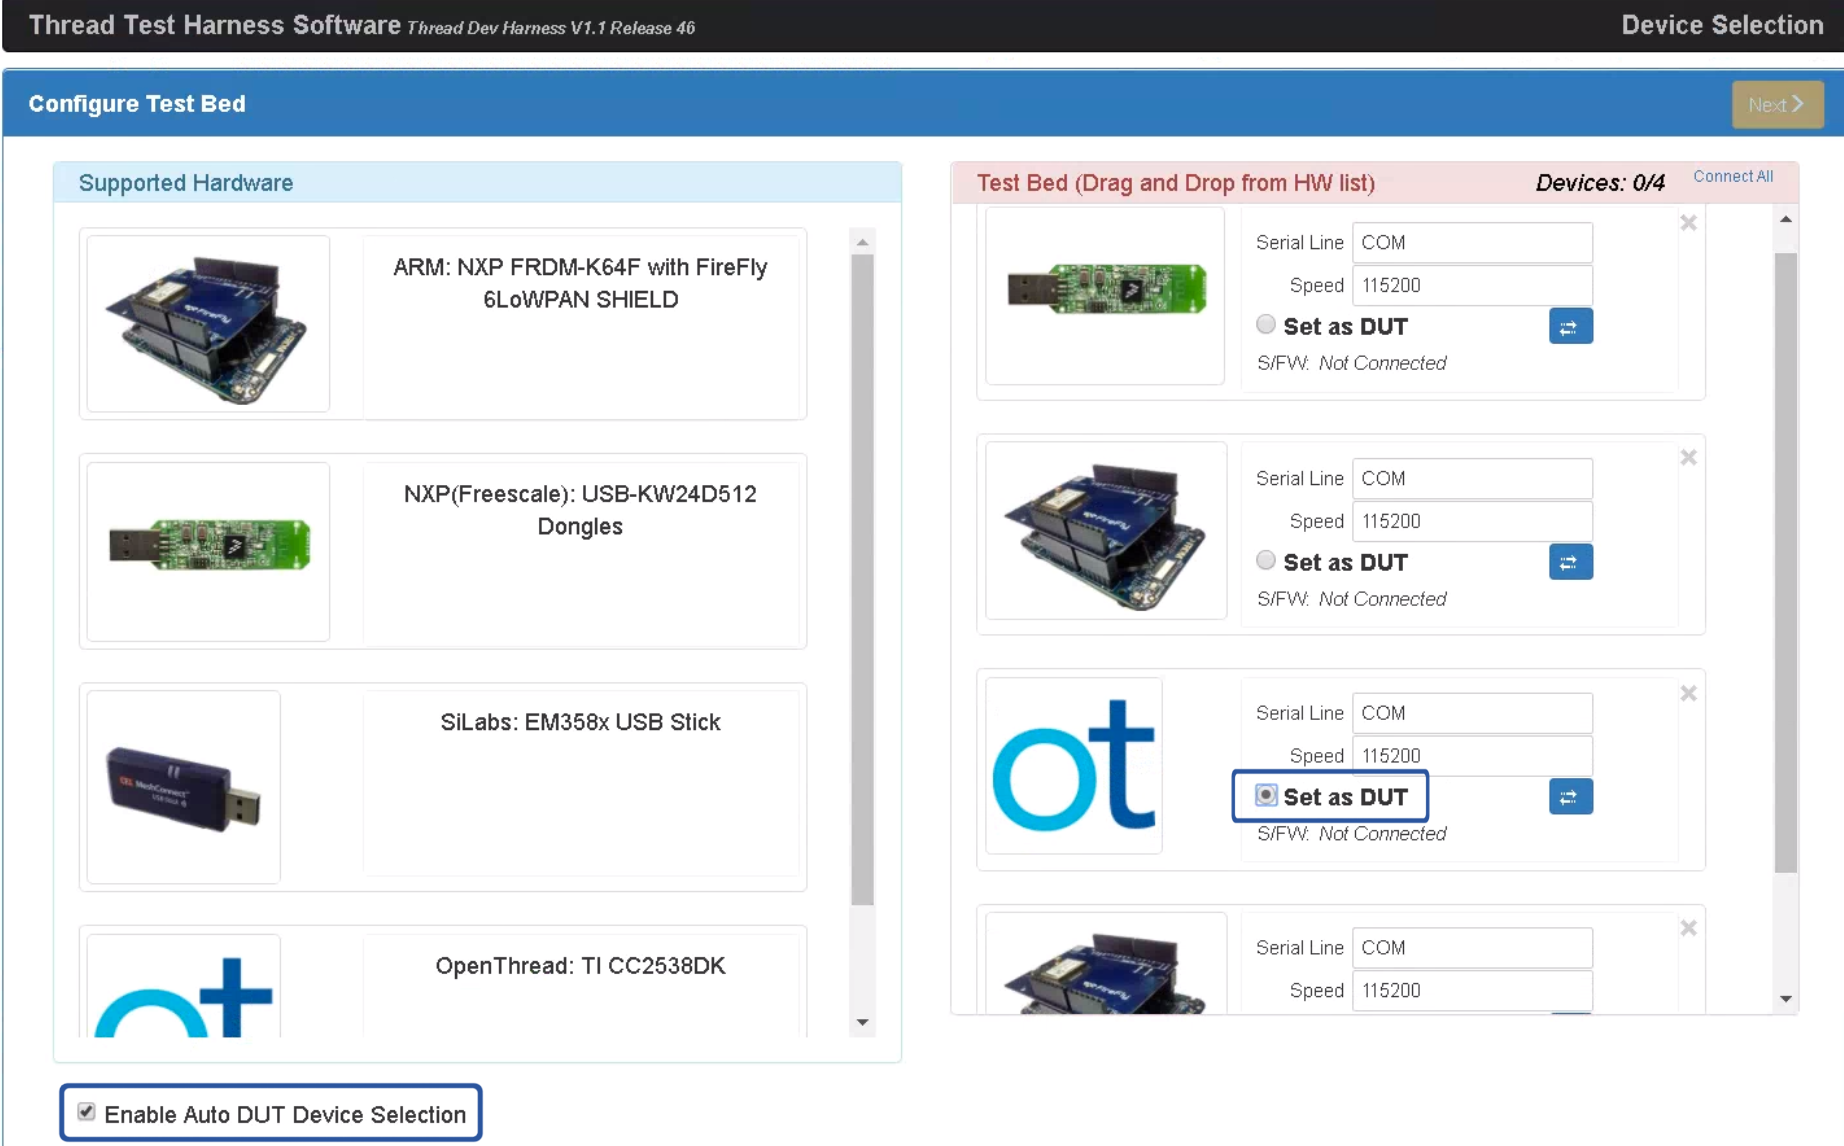
- Open the GRL Test Harness, the device/port now appears as a new reference device.
- Select the Enable Auto DUT Device Selection checkbox below the Supported Hardware list.
- Select the Set as DUT radio button under the target device/port to set the device as the DUT.