
Set up of the GRL Thread Test Harness and the OpenThread Harness Automation Tool for use with the OpenThread Border Router (OTBR) Device Under Test (DUT) is the same as the Certification Automation Setup guide. Use that guide in conjunction with the changes detailed here.
For an NCP design like OTBR, OpenThread provides an OpenThread_WpanCtl.py
example Thread Host Control Interface
(THCI)
that allows the Test Harness to control the NCP. There are two connection modes
for an NCP device:
- Using a serial port connection (recommended for use of the Test Harness's auto discovery feature)
- Using an SSH connection
Unless otherwise noted, all installation and configuration steps below occur on the Windows machine running the GRL Test Harness software, which should be installed before continuing.
Copy THCI support files
Make sure you have the latest version of THCI on the Windows machine. Clone the
OpenThread repository, or if you already have, switch it to the main branch:
git clone https://github.com/openthread/openthreadcd openthreadgit checkout mainCopy the following files from
/tools/harness-thci
in the cloned OpenThread repository to the specified directories on the Windows
machine:
| Source file | Copy to directory |
|---|---|
deviceInputFields.xml |
C:\GRL\Thread1.1\Web\data\ |
OpenThread_WpanCtl.py |
C:\GRL\Thread1.1\Thread_Harness\THCI\ |
OpenThread_WpanCtl.png |
C:\GRL\Thread1.1\Web\images\ |
Set up connection type
For Test Harness control of the NCP, set up either a serial port connection or an SSH connection.
Serial port connection (recommended)
On the Raspberry Pi 3B (RPi3B), enable the serial port and login shell:
- Enter the configuration menu:
sudo raspi-config - In the configuration menu, select 5 Interfacing Options.
- In the Interfacing Options menu, select P6 Serial Enable/Disable.
- Restart the RPi3B.
On the Windows machine running the Test Harness:
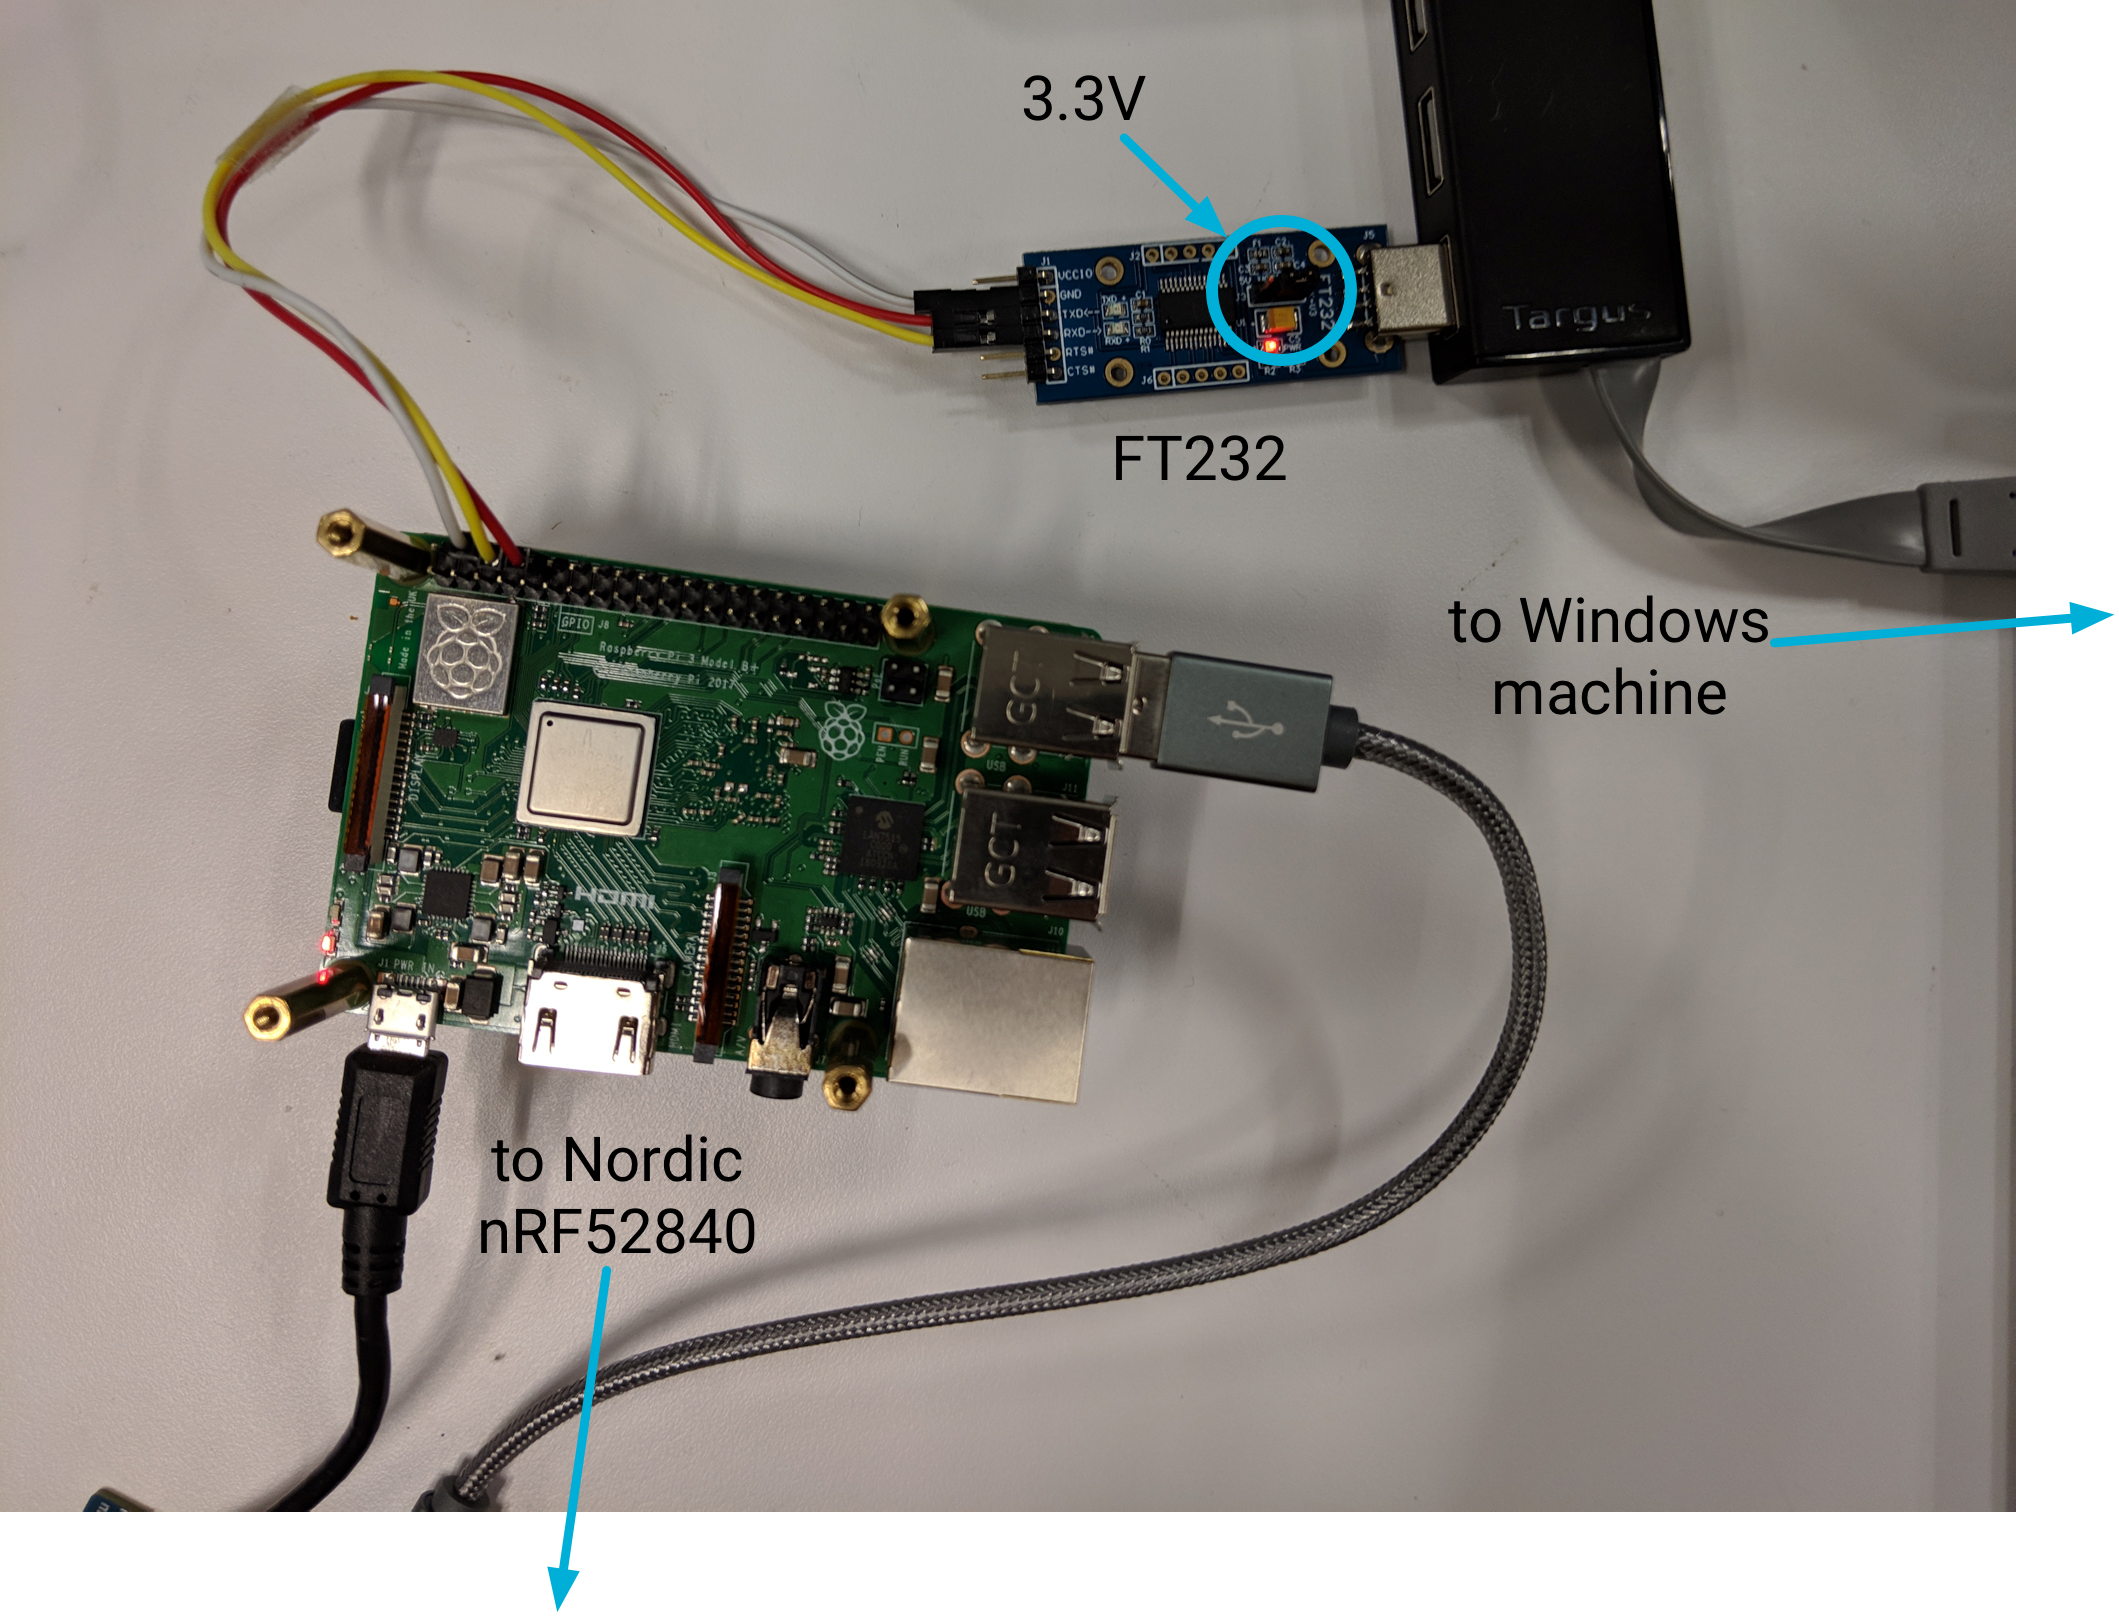
- Download and install the FT232 driver.
- Connect the FT232 USB to UART adapter to a USB slot on the Windows machine.
- Set the voltage jumper on the FT232 to 3.3V.
- Connect the FT232 to the RPi3B using the following pins and Dupont lines:
RPi3B Pin FT232 Pin Dupont Line Pin6 GND White Pin8 RXD Yellow Pin10 TXD Red - Once connected, restart the Windows machine.
- Find the device serial port hardware identifier, using the Python pySerial
module:
- Install pySerial on the Windows machine.
- Use Python on the Windows command line to enumerate all hardware
identifiers (VID and PID) for devices connected to the machine. In this
output, one NCP device is connected, with an identifier of
VID_0403+PID_6001.python -m serial.tools.list_ports -vCOM10desc: USB Serial Port (COM10)hwid: FTDIBUS\VID_0403+PID_6001+AL01WOSZA\0000 - If you know the COM port already, you can use a different command. For
example, if the COM port is
COM10:python -c "import serial.tools.list_ports;print [ports[2] for ports in serial.tools.list_ports.comports() if ports[0] == 'COM10']"['FTDIBUS\VID_0403+PID_6001+AL01WP6MA\0000']
- Update the Golden Device list:
- Open
C:\GRL\Thread1.1\Config\Configuration.ini - Add an OpenThread_WpanCtl grouping to the
GoldenDeviceHardwareIdsarray with the VID and PID of the device(s):GoldenDeviceHardwareIds = {
'NXP': ['VID:PID=1FC9:0300','VID:PID=15A2:0300','VID:PID=1366:1015'],
'SiLabs': 'VID:PID=10C4:8A5E',
'ARM': 'VID:PID=0D28:0204',
'OpenThread':['VID:PID=10C4:EA60', 'VID:PID=1915:CAFE'],
'OpenThread_WpanCtl':['VID_0403+PID_6001’]}
- Open
Once all configuration is complete:
- Start the GRL Test Harness.
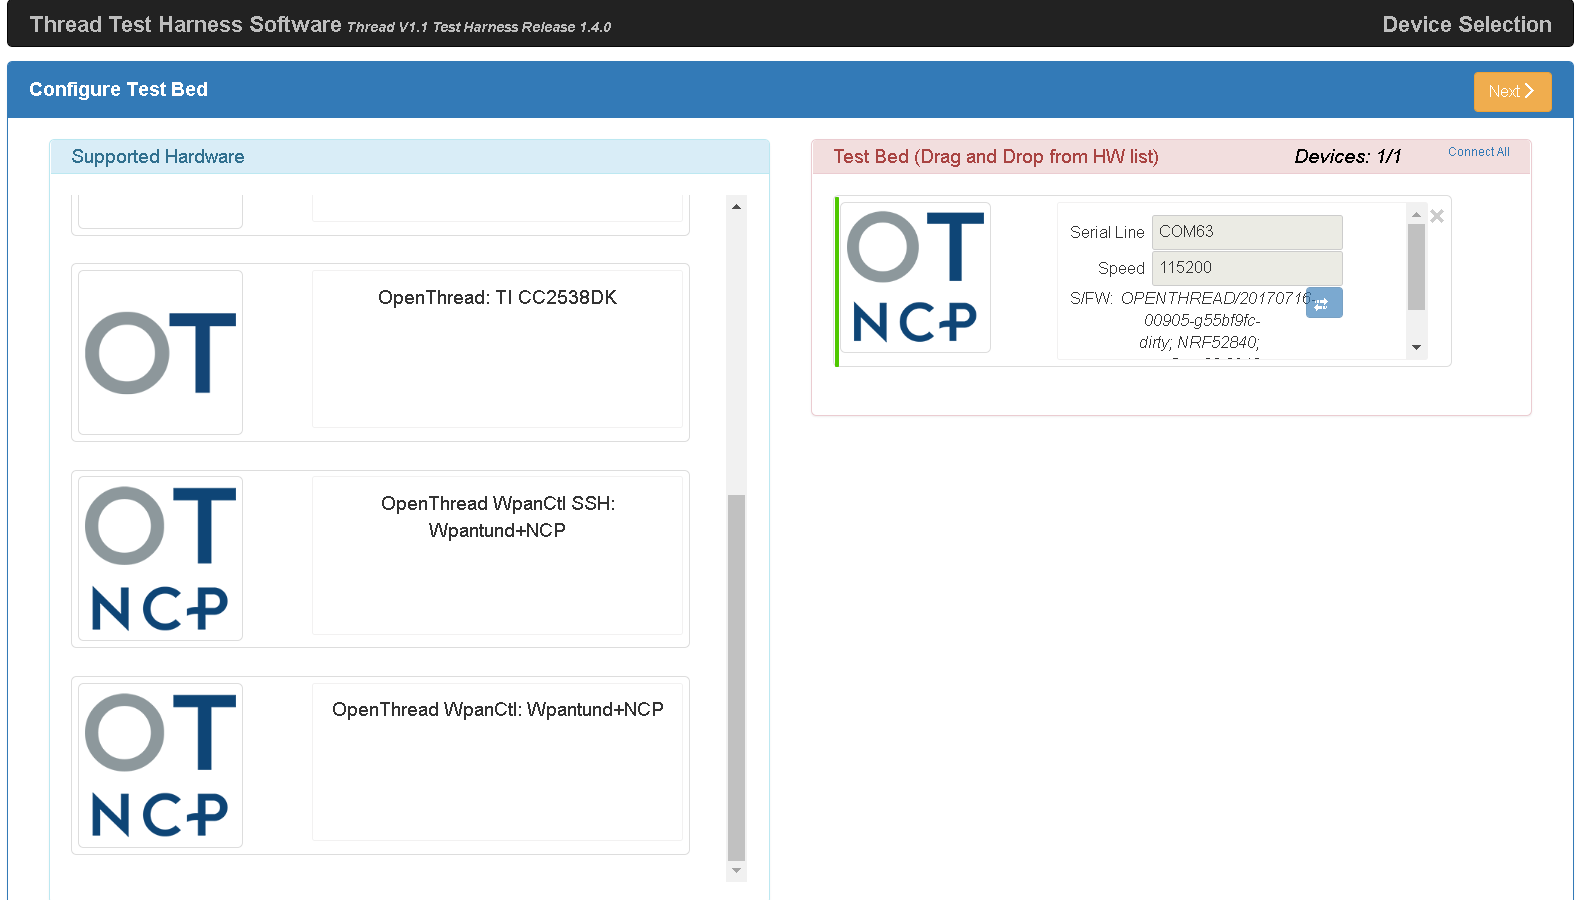
On the Configure Test Bed page, the device/port now appears as an OT NCP device.
If the DUT is not listed in the Test Bed section after the Test Harness is started, manually add it by dragging the OpenThread WpanCtl: wpantund+NCP device from the Supported Hardware section to the Test Bed section. After dragging:
- Ensure the correct Serial Line (COM port) and Speed (baud rate) values are populated.
- Click the arrow button below the Speed field to establish the serial connection between the Test Harness and the OT NCP device.
Select the Enable Auto DUT Device Selection checkbox below the Supported Hardware list.
Select the Set as DUT radio button under the target device/port to set the OT NCP device as the DUT.
SSH connection
On the RPi3B, enable SSH:
- Enable the SSH service on boot:
sudo systemctl enable ssh - Start the SSH service:
sudo systemctl start ssh
To enable SSH on a headless RPi3B, see Step 3 of the Raspberry Pi SSH documentation.
On the Windows machine running the Test Harness:
- Install Paramiko for GRL's Python environment:
cd C:\GRL\Python2.7python -m pip install --upgrade pippython -m pip install paramiko - Start the GRL Test Harness.
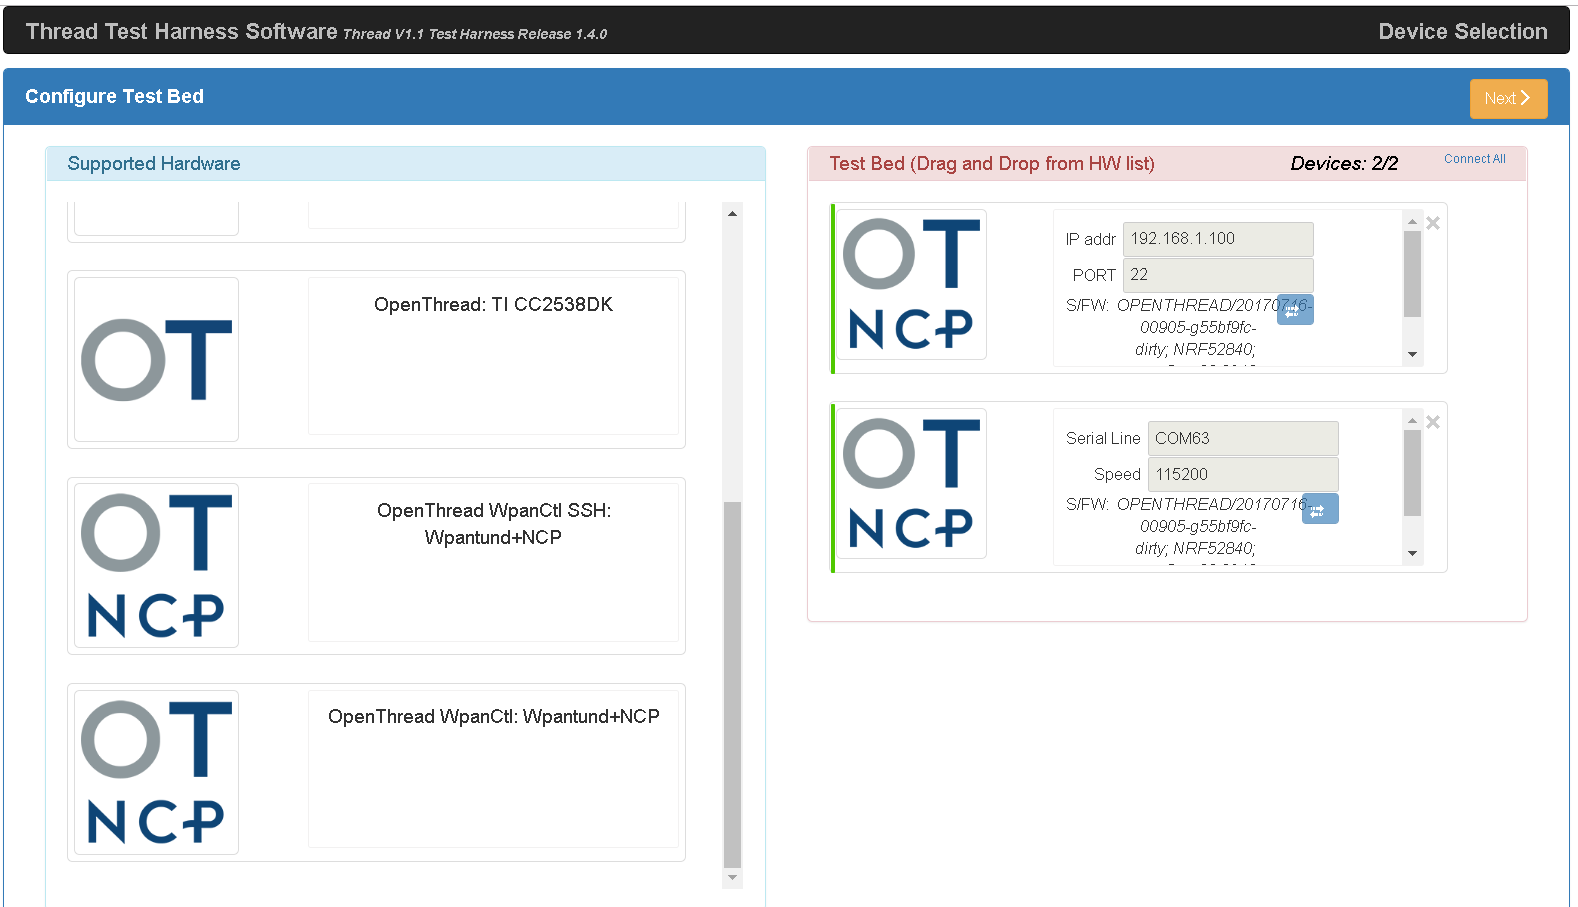
- On the Configure Test Bed page, drag the OpenThread WpanCtl SSH: wpantund+NCP device from the Supported Hardware section to the Test Bed section.
- Populate the IP addr with 192.168.1.100 and PORT with 22 for the device.
- Click the arrow button below the PORT field to establish an SSH connection between the Test Harness and the OT NCP device.
Automation Setup
See the Install and Configure steps from the Certification Automation Setup guide for instructions on how to set up the Harness Automation Tool.
Run test cases
See Running Certification Test Cases to learn how to run certification test cases on the OTBR DUT.
Troubleshooting
Device reboots
If you need to reboot the RPi3B, close the Test Harness software and wait at least 20 seconds after the reboot is complete to start the Test Harness again.
Test Harness fails to discover Border Router
When using a serial port connection, the Test Harness may not discover the Border Router. If this is the case:
- Check whether a Shell login works for the serial port, using a tool like
PuTTY.
- Use the COM port for the FT232 device and a speed (baud rate) of 115200.
- If the login fails, reboot all devices and try it again.
- On the RPi3B, check the status of
wpantund:sudo service wpantund status- Make sure the nRF52840 NCP board is mounted:
ls /dev/tty*/dev/ttyACM0 - Validate that this port matches the
wpantundconfiguration:// default value in '/etc/wpantund.conf' Config:NCP:SocketPath "/dev/ttyACM0"
- Restart
wpantund:sudo service wpantund restart
- Make sure the nRF52840 NCP board is mounted: