如需自动执行认证测试,还需要进行其他设置。
以下所有安装和配置步骤均在运行 GRL Test Harness 软件的 Windows 机器上进行。在继续之前,请下载并安装最新的 GRL Thread Test Harness。
安装完成后,被测设备 (DUT) 有两种自动化方法:
OpenThread Harness 自动化工具
安装
- 安装以下软件:
- Python 2.7
- Git for Windows(强烈建议支持 Bash)
- 克隆 OpenThread 代码库以获取自动化脚本:
git clone https://github.com/openthread/openthread - 安装 Python 要求:
cd tools/harness-automationpip install -r requirements.txt - 安装 Google Chrome 和 ChromeDriver。
配置
- 为自动化工具创建配置文件:
cp autothreadharness/settings_sample.py autothreadharness/settings.py - 根据文件中的说明更新该新配置文件。
- 将以下参数添加到测试框架配置文件(位于
C:\GRL\Thread1.1\Config\Configuration.ini)中:BrowserAutoNavigate = False
混合测试平台支持
Harness Automation Tool 还支持混合测试平台,其中每个测试用例中使用的参考设备是一组混合设备,而不是全部相同的设备。例如,您可以根据需要,在每个测试用例中混合搭配使用所有四种 Thread 参考设备,而不是在所有测试用例中都使用 32 个运行 OpenThread 的 TI CC2538 板。
如需使用混合测试平台,您需要进行额外配置:
- 将以下附加参数添加到测试框架配置文件(位于
C:\GRL\Thread1.1\Config\Configuration.ini)中:EnableDeviceSelection = True
- 从 ThreadGroup 下载拓扑配置文件。
将此文件以
TopologyConfig.txt的形式添加到C:\GRL\Thread1.1\Thread_Harness\TestScripts。此文件详细说明了在每个测试用例中,每个角色应使用哪个参考设备。
Thread Group 提供的拓扑配置文件可针对其他混合床配置进行修改,但若要获得正式认证,必须使用原始配置。
在拓扑配置文件中,可用于参考设备的有效值包括:
| 拓扑配置文件中的值 | 自动化测试框架参考设备 |
|---|---|
ARM |
ARM:NXP FRDM-K64F,搭配 Firefly 6LoWPAN Shield |
NXP |
NXP(Freescale):USB-KW24D512 加密狗 |
OpenThread |
OpenThread:TI CC2538DK |
SiLabs |
Silabs:EM358x USB 棒 |
拓扑配置文件中的每个测试用例条目都必须单独列为一行,并采用 role:device 对格式,如下所示:
5.3.10-Leader:NXP,Router_1:OpenThread,BorderRouter:OpenThread,MED_1:ARM
自动化测试框架自动 DUT 模式
GRL Test Harness 软件提供高级自动发现功能 (Auto DUT),可加快 Thread 参考堆栈供应商的验证流程。
OpenThread 提供了一个示例 Thread 主机控制器接口 (THCI),该接口允许测试框架控制您的组件或产品,就像控制某个参考平台一样。根据具体平台的串行端口特征,DUT 可能:
充当现有的 OpenThread 参考平台
如果 DUT 的串行端口在 115200 8-N-1 的设置下正常运行,并且设备在每次物理设备重置后都能正确响应(例如,确认设备与 Windows 机器的连接有效),则平台可以使用 OpenThread THCI 工具。此工具可让设备在测试期间充当 OpenThread 参考平台。
- 关闭 GRL 测试框架(如果已打开)。
- 将设备连接到 Windows 计算机。
- 使用 Python pySerial 模块查找设备串行端口硬件标识符:
- 在 Windows 计算机上安装 pySerial。
- 在 Windows 命令行中使用 Python 枚举连接到计算机的设备的所有硬件标识符(VID 和 PID)。在此输出中,一个设备的标识符为 VID=1366 和 PID=1015:
python -m serial.tools.list_ports -vCOM10desc: USB Serial Port (COM10)hwid: USB\VID_1366+PID_1015+MI_00 - 如果您已知道 COM 端口,则可以使用其他命令。例如,如果 COM 端口为
COM10:python -c "import serial.tools.list_ports;print [ports[2] for ports in serial.tools.list_ports.comports() if ports[0] == 'COM10']"['USB\VID_1366+PID_1015+MI_00']
- 更新黄金设备列表:
- 打开
C:\GRL\Thread1.1\Config\Configuration.ini。 - 使用设备的 VID 和 PID 更新
GoldenDeviceHardwareIds数组中的 OpenThread 组:GoldenDeviceHardwareIds = {
'NXP': ['VID:PID=1FC9:0300','VID:PID=15A2:0300','VID:PID=1366:1015'],
'SiLabs': 'VID:PID=10C4:8A5E',
'ARM': 'VID:PID=0D28:0204',
'OpenThread':['VID:PID=10C4:EA60','VID:PID=1366:1015']}
- 打开
- 启用自动 DUT 模式。
充当新的参考平台
如果 DUT 的串行端口在正确的串行端口设置下无法正常运行,或者设备在物理设备重置后无法正确响应(在重置后的 3-6 秒内输出无法读取的代码),则可以自定义 OpenThread THCI,以将设备视为测试框架中的新平台。
例如,如需使用 Nordic Semiconductor nRF52840 平台自定义 THCI,请执行以下操作:
- 关闭 GRL 测试框架(如果已打开)。
根据目标设备的 UART 特征修改
/tools/harness-thci/OpenThread.py。不同目标设备之间的修改可能有所不同。对于 Nordic nRF52840 平台:- 将
OpenThread.py文件重命名为nRF52840.py。 将前三次出现的“OpenThread”更改为“nRF52840”:
>> Device : nRF52840 THCI
>> Class : nRF52840

class nRF52840(IThci):
更改串行端口参数:
def _connect(self):
    print 'My port is %s' % self.port
    if self.port.startswith('COM'):
        self.handle = serial.Serial(self.port, 115200, timeout=0)
        time.sleep(1)
        self.handle.write('\r\n')
        time.sleep(0.1)
        self._is_net = False
    elif ':' in self.port:
        host, port = self.port.split(':')
        self.handle = socket.create_connection((host, port))
        self.handle.setblocking(0)
        self._is_net = True
    else:
        raise Exception('Unknown port schema')
    self.UIStatusMsg = self.getVersionNumber()
更改休眠时间,以消除设备重置后无法读取的代码输出的影响:
def powerDown(self):
    """power down the Thread device"""
    print '%s call powerDown' % self.port
    self._sendline('reset')
    self.isPowerDown = True
    time.sleep(8)  # New addition

def reboot(self):
    """reset and rejoin to Thread Network without any timeout

    Returns:
        True: successful to reset and rejoin the Thread Network
        False: fail to reset and rejoin the Thread Network
    """
    print '%s call reboot' % self.port
    try:
        self._sendline('reset')
        self.isPowerDown = True
        time.sleep(8)  # Updated from 3 to 8

def reset(self):
    """factory reset"""
    print '%s call reset' % self.port
    try:
        self._sendline('factoryreset')
        time.sleep(8)  # Updated from 3 to 8
        self._read()

def resetAndRejoin(self, timeout):
    """reset and join back Thread Network with a given timeout delay

    Args:
        timeout: a timeout interval before rejoin Thread Network

    Returns:
        True: successful to reset and rejoin Thread Network
        False: fail to reset and rejoin the Thread Network
    """
    print '%s call resetAndRejoin' % self.port
    print timeout
    try:
        self._sendline('reset')
        self.isPowerDown = True
        time.sleep(timeout)
        if timeout < 8:      # Sleep a bit longer if the timeout is short
            time.sleep(8 - timeout)
- 将
将修改后的
nRF52840.py文件复制到C:\GRL\Thread1.1\Thread_Harness\THCI将新平台信息添加到自动化测试框架:
- 创建图标(采用 png 或 jpg 格式),以便更轻松地区分您的平台,然后将其复制到
C:\GRL\Thread1.1\Web\images。 使用新的
DEVICE部分更新C:\GRL\Thread1.1\Web\data\deviceInputFields.xml,其中thumbnail参数是图标文件:<DEVICE name="nRF52840" thumbnail="nRF52840.jpg" description ="nRF52840: Nordic" THCI="nRF52840"> <ITEM label="Serial Line" type="text" forParam="SerialPort" validation="COM" hint="eg: COM1">COM </ITEM> <ITEM label="Speed" type="text" forParam="SerialBaudRate" validation="baud-rate" hint="eg: 115200">115200 </ITEM> </DEVICE>
- 创建图标(采用 png 或 jpg 格式),以便更轻松地区分您的平台,然后将其复制到
将设备连接到 Windows 计算机。
使用 Python pySerial 模块查找设备串行端口硬件标识符:
- 在 Windows 计算机上安装 pySerial。
- 在 Windows 命令行中使用 Python 枚举连接到计算机的设备的所有硬件标识符(VID 和 PID)。在此输出中,一个设备的标识符为 VID=1366 和 PID=1015:
python -m serial.tools.list_ports -vCOM10desc: USB Serial Port (COM10)hwid: USB\VID_1366+PID_1015+MI_00 - 如果您已知道 COM 端口,则可以使用其他命令。例如,如果 COM 端口为
COM10:python -c "import serial.tools.list_ports;print [ports[2] for ports in serial.tools.list_ports.comports() if ports[0] == 'COM10']"['USB\VID_1366+PID_1015+MI_00']
更新黄金设备列表:
- 打开
C:\GRL\Thread1.1\Config\Configuration.ini。 - 在
GoldenDeviceHardwareIds数组中添加一个包含设备 VID 和 PID 的新平台组:GoldenDeviceHardwareIds = {
'NXP': ['VID:PID=1FC9:0300','VID:PID=15A2:0300','VID:PID=1366:1015'],
'SiLabs': 'VID:PID=10C4:8A5E',
'ARM': 'VID:PID=0D28:0204',
'OpenThread':'VID:PID=10C4:EA60',
'nRF52840': 'VID:PID=1366:1015'}
- 打开
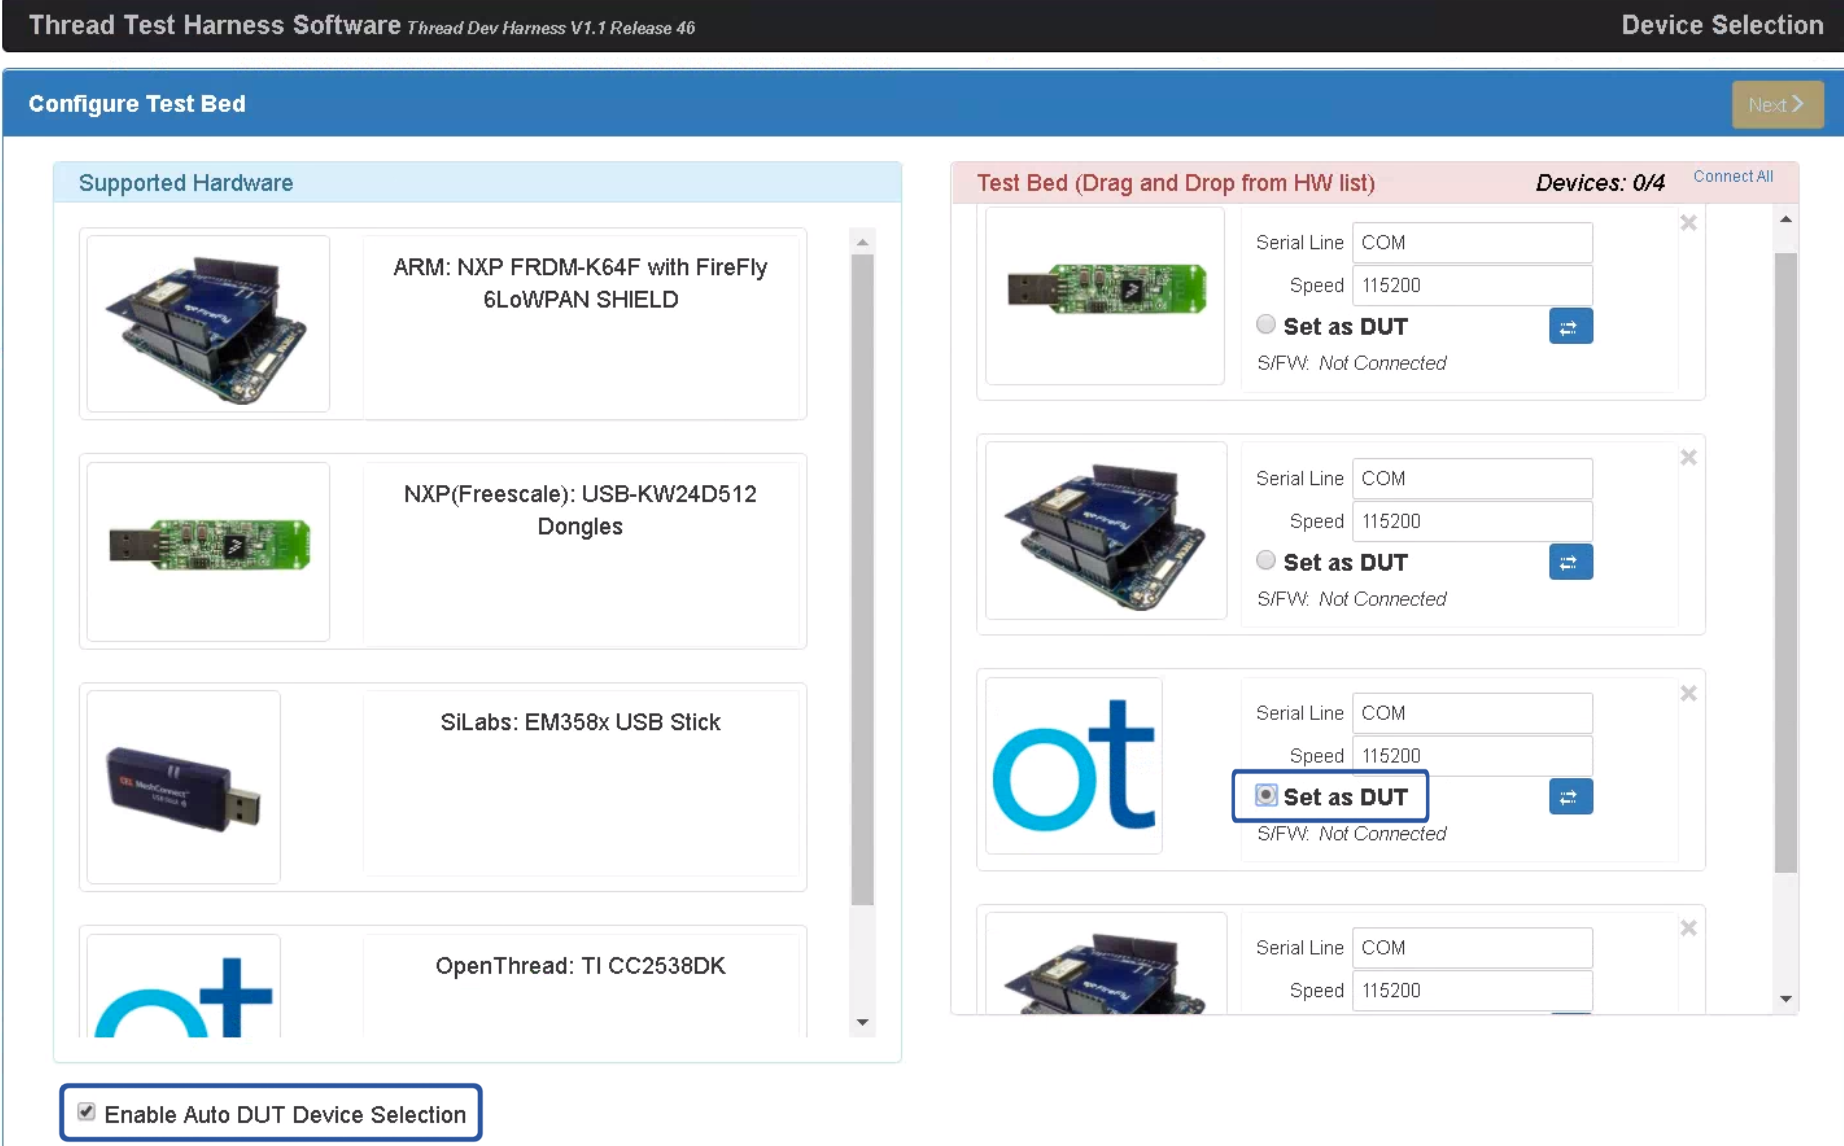
启用自动 DUT 模式
完成上述两种配置选项之一后:
- 打开 GRL 测试框架,设备/端口现在显示为新的参考设备。
- 选中“支持的硬件”列表下方的启用自动 DUT 设备选择复选框。
- 选择目标设备/端口下的设为 DUT 单选按钮,将设备设为 DUT。